Pottery Barn Inspired Mason Jar Chandelier January 12, 2011

Source: Pottery Barn
I know. Beautiful isn’t it? Can’t you just imagine it hanging in your home? I could too….but NOT for $399. But lucky me has an electrician for a husband!! And here’s how I convinced him he was just the guy for the job..our conversation went somewhat like this:
Me: Honey! I have a new job for you that I know you’ll be REALLY GREAT at.
Him: What’s that?
Me: We are going to make this! (showing him picture) You are the best electrician in the world, I know you can do it! And I will help you!
Him: Oh alright.
Okay, so it didn’t take much convincing. After we got all the materials and sat down to start our project, he actually tried to refuse my help! Then again, what guy doesn’t love DIY projects?
The Pottery Barn version has 16 jars, measuring 35 inches wide by 32 inches high. Our condo’s small kitchen could not accommodate a chandelier that size (which is where we planned on hanging the fixture). So we scaled it down to half the size of the PB version and planned on using only 8 jars (we can also expand it in the future!)

Here’s a shot of the transformation of a jar to a light!
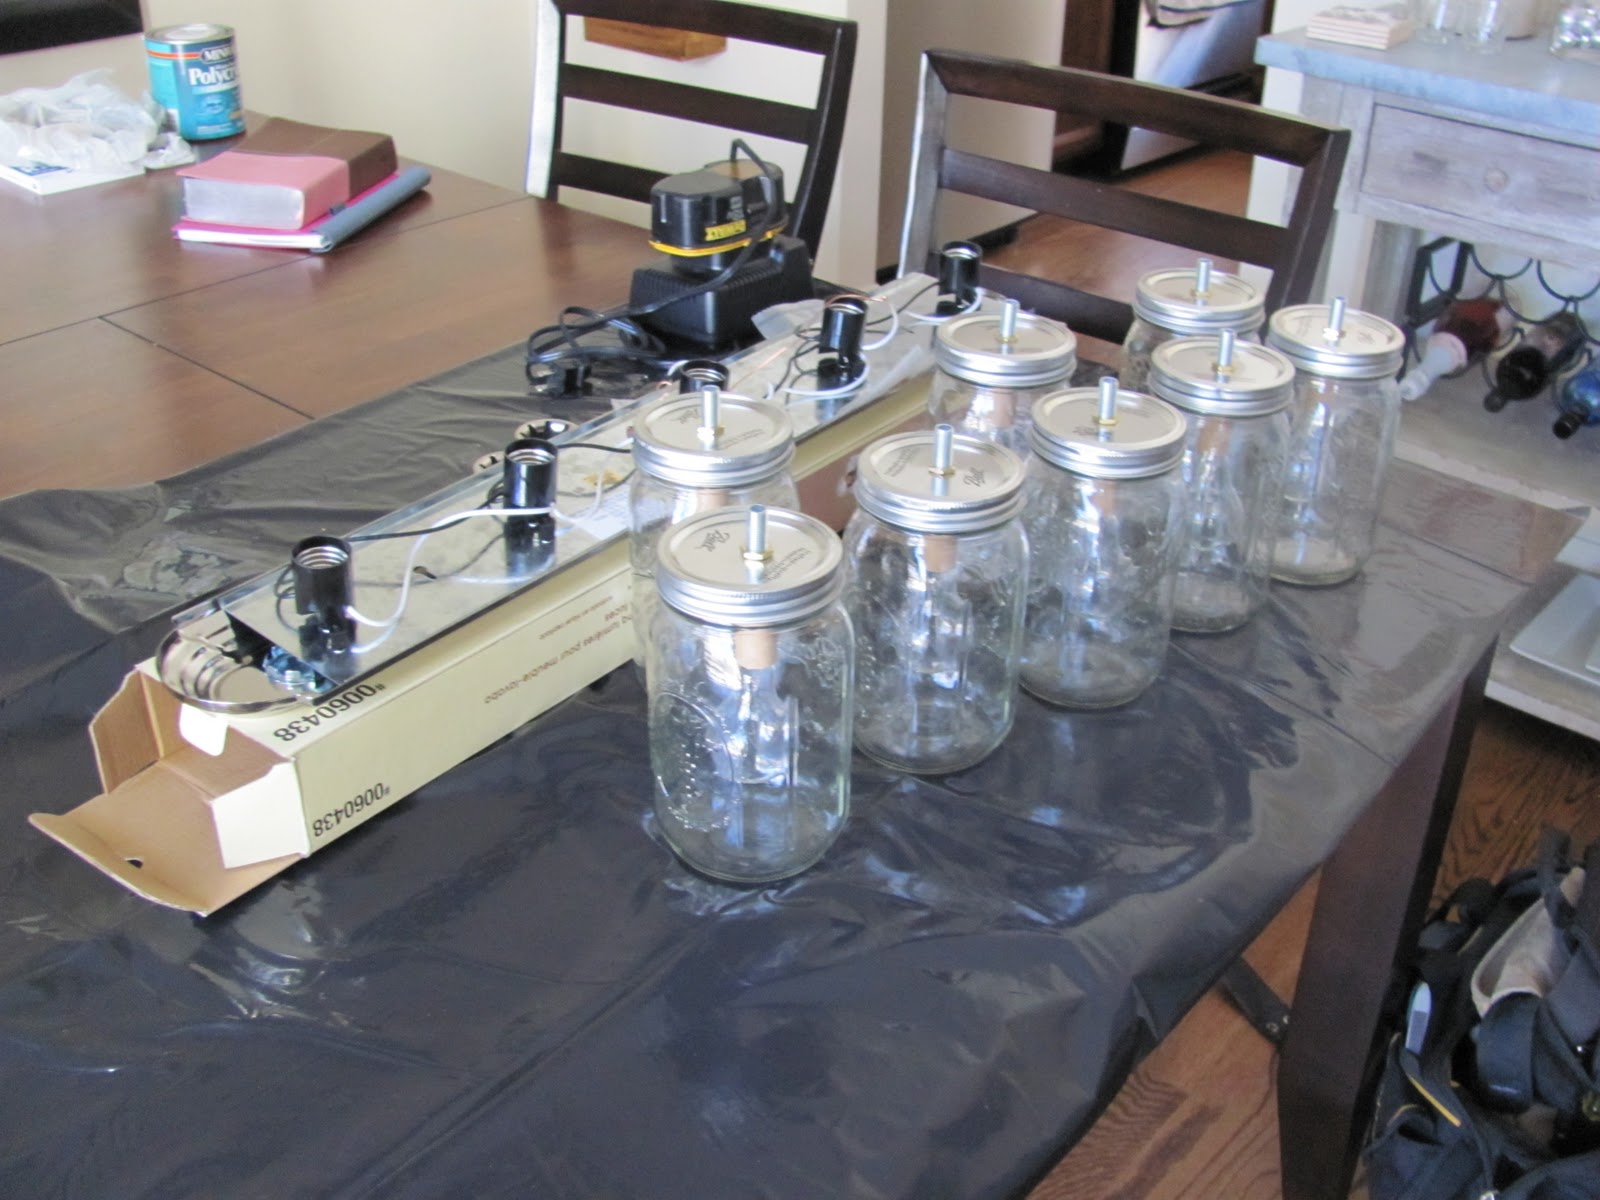
Lined up and ready to be wired!
We were smooth sailing until discussing how we would actually mount the fixture to the ceiling, and what type of fixture we would use. We could have used the back of a vanity light, which was our initial plan, but I felt like it could still be done cheaper and look nicer. Which is when yours truly put her carpenter hat on and decided we would build the ceiling mount ourselves from wood. I was the brains behind the building of it, while he helped put it together 🙂 A little Rustoleum Dark Bronze Hammered Spray Paint gave it the rustic metal finish it needed. I also sprayed one coat of the spray paint on the tops of the jars. This allowed some of the original silver to show through, adding to the look.
And when all was said and done, we were left with this…..

I love it! And it added some extra light to our kitchen!
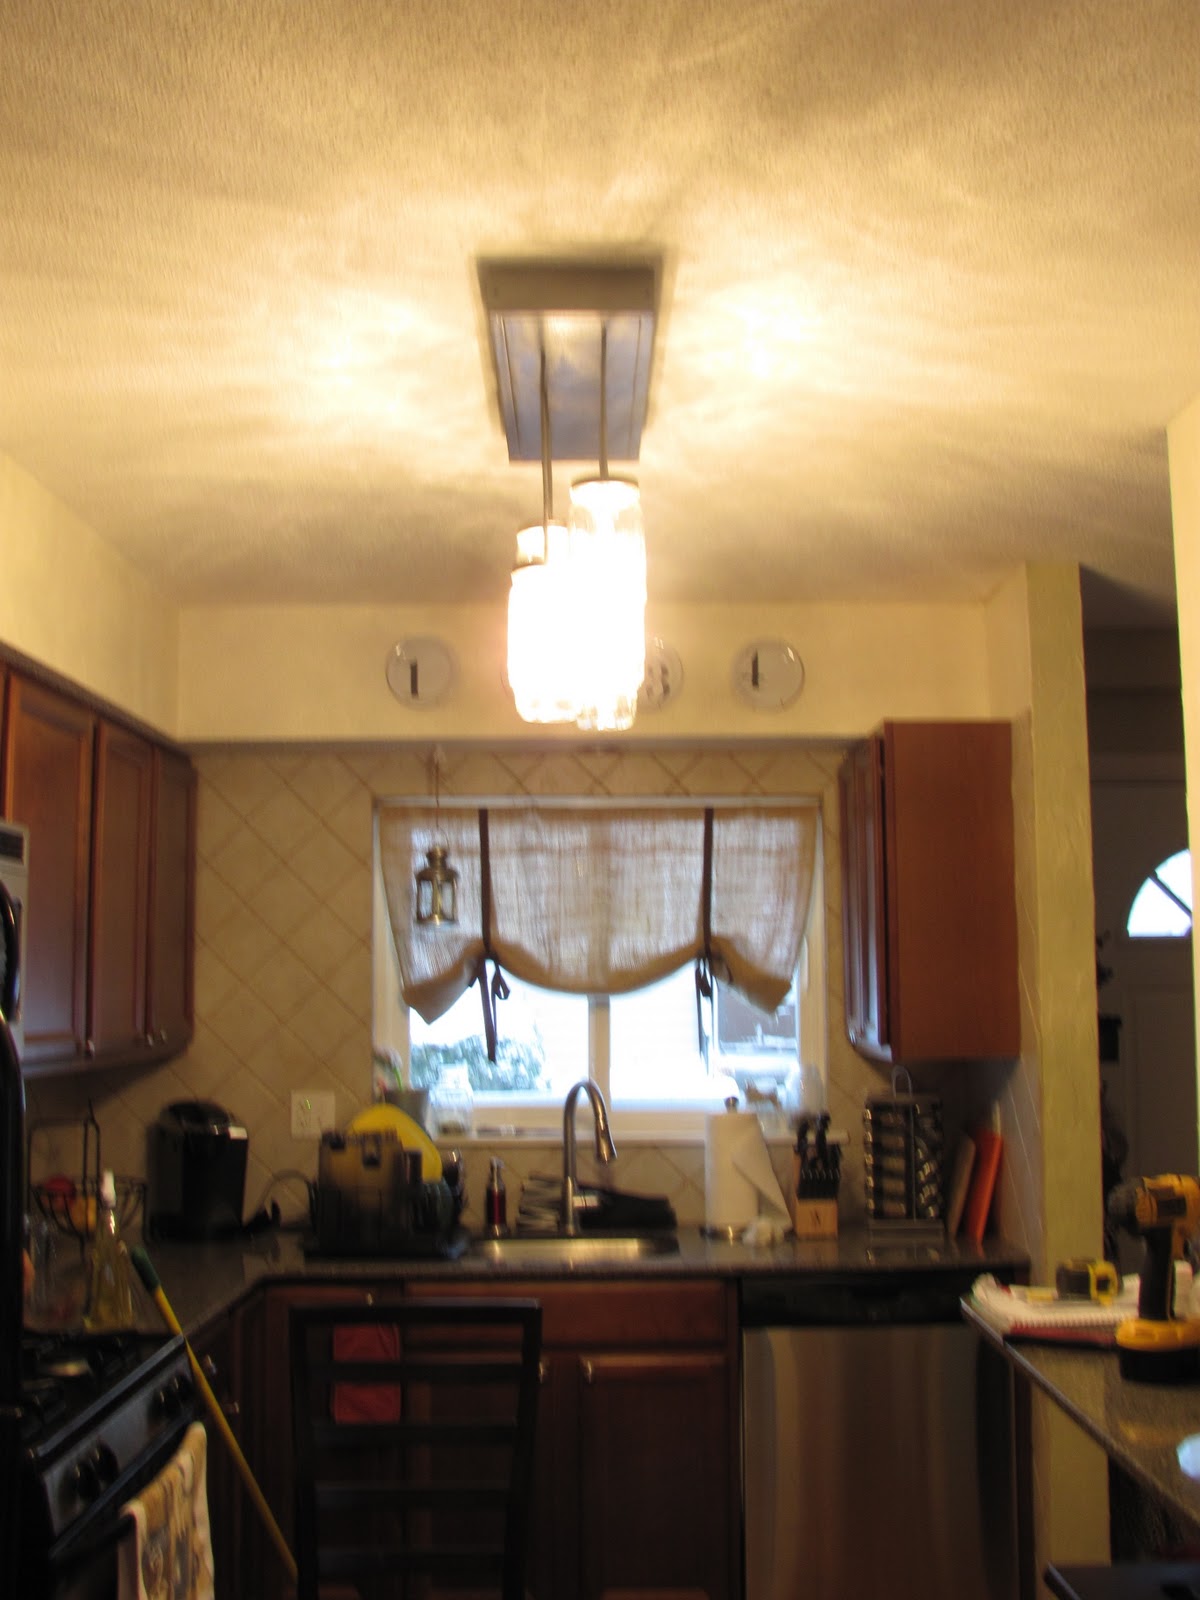
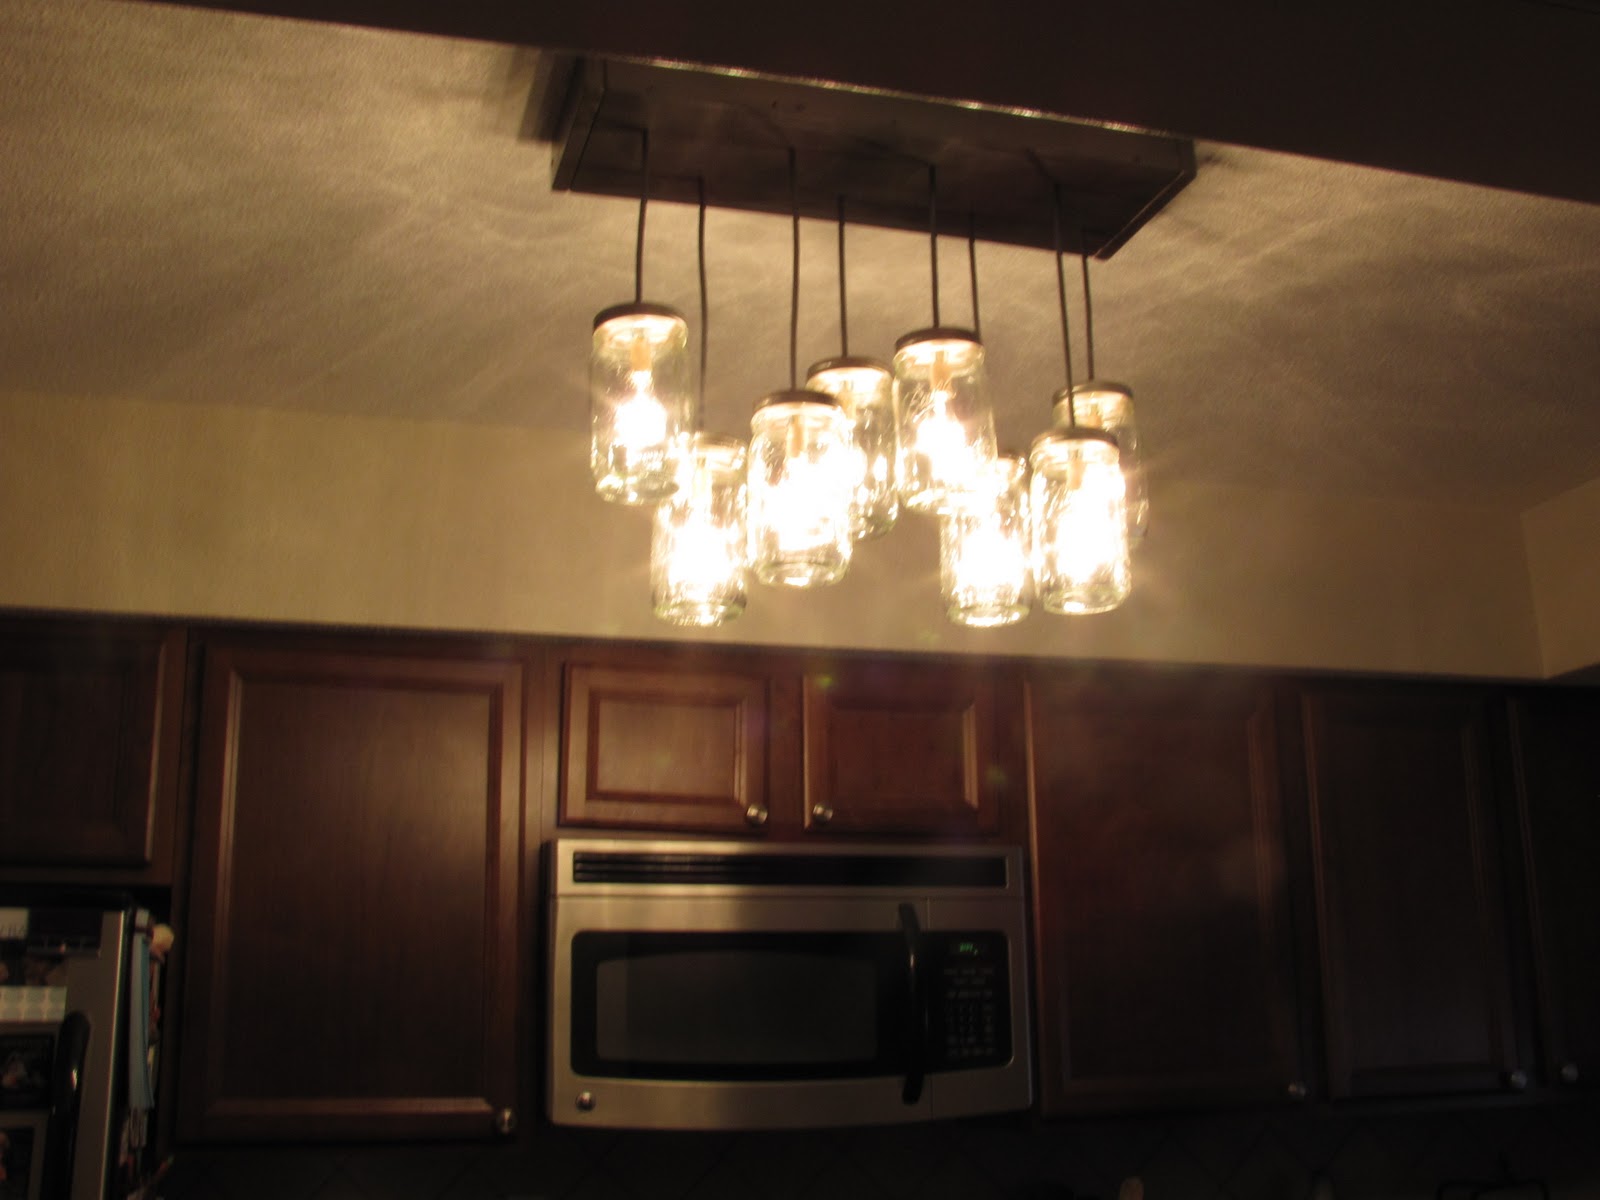
Our very own PB inspired mason jar chandelier…for less than $100.
What do you think? We are so proud of our work! 🙂
Linking up to:


oh this is GREAT! you are making mine next right?? 😉
I love it!!!! Good job!!!!
Very proud of the both of you!
Love MOM
I love that chandelier! I wish my husband had that electrical experience, for now we're leaving it to the pros. 🙂
What do I think? BRILLIANT! Great teamwork created a beautiful project! Thanks so much linking up at WhisperWood Cottage!
Thank you ladies! It makes me smile every time I walk into our kitchen! 🙂
I've been wanting to do one of these for a long time…I've collected some old jars with zinc lids just for this! Is there a special bulb socket you need for this? Actually which one did your hubby use? LOL!
I am in awe! And I love it!!!
Hi Cindy, I tried to reply to your comment, but it says "no-reply" in the e-mail line! Anyways, I think it's called a keyless socket…if you have a Lowe's near you, they are in the lighting section! It's the same socket as a table lamp, they have them in all different sizes. We just happened to use the smaller one because they came in a package of 2 (so they were cheaper) and the lightbulbs would be smaller and and fit nicely in the jar (I didn't want a regular sized lightbulb in there). We threw the packaging out, otherwise I would tell you the exact name! If you have any more questions, feel free to e-mail me! 🙂
WOW! This is amazing! I'd love to see you on my weekend linky party 🙂
This is awesome!!!!!! LOVE it! I may just have to get Ebiel to take a look at this… 🙂
I really like this. I wonder if someone who wasn't an electrician could figure it out? What do you think? Was it difficult?
An fantastic example of how to get the look for less. Very cool.
Thanks ladies! Vanessa, you can absolutely do it without an electrician! It's simply drilling some holes and inserting lamp sockets into the jars, and using lamp cord for the wire. However, the wiring part is a little scary to me (I'm always afraid of being shocked or blowing something up, haha) so it was helpful to have a professional around!
my hubby and i are about to start a kitchen remodel. i've been looking for the right kind of lighting to go over my sink– this might just be it!
This is absolutely gorgeous!! I am a mason jar girl!! 🙂
Well done! So inventive, I really love it.
Could you give us a list of the exact materials ?
This looks so cool! I like the smaller size too; fits the space great! Nice work 🙂
Omg! I just wrote a post too about making a mason jar pendant light!
http://girlinair.blogspot.com/2011/01/turn-that-boring-can-light-into.html
We will also be doing the chandelier above the table too…
I have been getting a few emails about the safety of this and the jars possibly exploding if not using a low watt bulb cause there's not venting and some bulbs get really hot…I'm thinking I might need to drill some holes in my lids just to be safe:0
Great blog!
This looks fantastic! Thanks for sharing 🙂 I've been eyeing the milk bottle chandy at PB, trying to figure out how to recreate it!
http://www.potterybarn.com/products/milk-bottle-chandelier/
Do the glass jars get really hot after leaving the lights on for a while? What wattage of lights are you using? I am so INTRIGUED! Would you be willing to share a picture of the inside of the wooden box? I'd like to see how it's all wired up.
Hi everyone! Thank you so much for your comments, they mean a lot to me! I didn't expect so many! 🙂 I will add a new post answering some of the questions you asked, ie: bulb wattage, materials, etc. this weekend! Hope that helps everyone, but feel free to contact me with anymore questions!!
awesome, awesome, awesome! you have inspired me!
Hi Lauren, I love it! Y'all did a great job. And don't you love it all the more knowing you created it not to mention the money you saved.
Hugs…Tracy 🙂
Wow – I'm so impressed! It turned out amazing!
i absolutely LOVE this! i've been trying to gather the materials needed to make one for my own kitchen and spent half an hour talking with the electrical guy in home depot today! he thinks that just using the keyless socket and the cord are not enough support to hold the jar. did you reenforce these in anyway? you can email me at [email protected] also…thanks so much, great work and i love your blog!
Oh my gosh this is so cool! I am totally impressed…and it looks great in your kitchen. I found you at FJI and am your newest follower. Come visit my blog if you have time…~Ann
This is absolutely the coolest idea ever! Great to hear that you used jars and yes, I must agree that your kitchen looks even great with this decoration. Great job!
I have been collecting items to DIY this and am SO glad I found someone who DIY'ed it and ended up looking great! Thanks so much for posting 🙂
http://www.whatyoumakeit-coley.blogspot.com
I have been wanting this light from Pottery Barn forever and have wanted to DIY it. I'm so glad someone else has done it and got great results!! Awesome work 🙂
http://www.whatyoumakeit-coley.blogspot.com
Can you please either list or email the list of supplies you used to make the pottery barn mason jar inspired chandelier. THANK YOU!!!!
This is so beautiful, and I was wanting to make it for my mom. Is there anyway you could post instructions for the electrical part of it?
thanks!
Hi Kathleen…I planned on posting instructions, but the problem is that it’s been so long now I don’t remember how we did it! We are re-creating one for a blog reader, so that should prompt my memory 🙂 Stay tuned!
This light is special. You did a great job. I will be doing one for my dining roon. Thank you for the inspiration.
Thank you Barb 🙂 My husband likes to brag about it every time we have someone new over our house 🙂
This is so beautiful! This is just the look we were going for in our kitchen. Any luck with putting together a list of materials? My husband’s very good with things like this, but we want to do it right! Thanks so much for sharing 🙂
I have yet to put a list together. I know, I’m horrible :/ BUT, we are going to be re-creating it so I will put a list together then 🙂
I LOVE this light, and it is perfect in the size you made it. I thought the PB one was just too big/bulky for our house. I haven’t seen the instructional post, but thought maybe it hadn’t been published just yet. Am I missing it?
You aren’t missing it! I am a horrible person and have yet to post a material list with instructions 🙁 The problem is my husband knows the technical terms and we have yet to sit down and go through it together. But, we are recreating it, so I plan on doing it then. 🙂
Searched Pinterest for Mason Jar Chandelier and this is where I landed! Great job and thanks for sharing 🙂 my husband is also an electrician and talking him into another project is not easy! I showed him your post hoping he would have a good laugh and spark (lol) a little interest. His first question was how will heat escape from the jar? Did you cut holes in the lid? Thanks again for sharing! -Becca
Hi Becca! Yes, we drilled a small hole in the top of each jar so heat could escape. We’ve had no issues with it! 🙂 Thanks for stopping by!
What an incredible knock off!! I think I’m going to have to go thrifting for some Mason jars! Found you through the Best DIY Project of 2011 contest!
Hi Beth!!! Thanks so much! We are really proud of it 🙂 The hubs like to brag to whoever walks in the room about how we built our own light fixture, haha.
What a unique piece! Would love love for you to share this at my Best of 2011 party going on now http://space46.blogspot.com. Feel free to link up other projects if you’d like. Happy new year! My
I will definitely stop by and link up! 😀
that really looks pretty darn cool !
– KAT –
Thank you Kat! It really does 🙂
Beautiful! I did one with bare bulbs and making the wood fixture to hide the wires was he hardest part. but it looks great!
That was definitely the toughest part! Thanks for stopping by!
This turned out sooooooo GREAT!
Eat your heart out, Pottery Barn! : )
I would be thrilled if you would link this up at my first ever Feature Friday Free-for-All (200+ links already and growing…yes, I’m a little excited! ; )).
http://www.fivedaysfiveways.com/2012/01/feature-friday-free-for-all-1.html
P.S. I’m your newest follower. : )
~Abbie (www.fivedaysfiveways.com)
Thanks Abbie! I’ll stop over to check it out 😀
I love it! Any detailed instructions available?
This is AMAZING! Love it! It would be perfect over the table of our “farmhouse” very rustic and delightful! If you get around to directions please send them my way I would love a detailed description of how you put this together. Thanks so much!
Thanks Ashley! Hoping to get one up soon!
I am soooo looking forward to putting this in my kitchen any idea when you might post the materials list, I would love to get this up ASAP. Thank you!
Ooooo! I just LOVE this! What brand of canning jars did you use? Thank you for sharing!
Ball canning jars! I got them at Walmart 🙂
I too am excited to see a list of materials used and how the wires are attached together and then into the ceiling. Close up pictures of the sockets and wiring would be a tremendous help! Thanks for sharing your project!
Wondering how you attached it to the ‘box’ etc – looking forward to that list – thanks for sharing.
I would love to try but am a little intimidated by wiring. Please post more details!
I love this. My daughter and I have been drooling over the PB version but my budget as single mom of three kids will not permit that purchase. I have a handy man who may be able to re-create your version but I would need a detailed instruction and list of items to purchase. Also, how is the wood laying flush against the ceiling? is it hollowed out? How is the wood mounted? So many questions. Very interested, please keep me updated when you finish your second instructional blog chandelier.
The wood is hollow! We actually formed a box using 4 pieces of wood so the wire can come together inside the box. The top piece of wood (which you can’t see because it’s inside the box) is screwed into the ceiling, which is how the fixture is lying flush. Hoping to get instructions soon when we recreate it!
stunning..looking forward to the instructions…great job!
I have wanted the PB version and didn’t want to spend 400 bones. I tried to figure out how to make it myself but couldn’t! You’ve got the brains and your chandelier has the look 🙂 I’d love you to share it at my first link party.
http://burlapanddenim.com/2012/03/party-on-mondays-1/
Thanks Amanda! I will check it out and link up!
Hello!
We are getting ready to purchase or first home and I would love to recreate this! Any word on detailed instructions? Mainly how the wiring is mounted on the back of the wood. I know you’re probably a really busy lady and I am sorry for bugging you. Even if you can give a starting point I can figure the rest out. Thanks for your time in advance.
Hi Misty! I’m sorry, I’ve been so bad with posting instructions 🙁 Basically we drilled holes the appropriate size of the wire in the wood and pulled it through. My husband put plastic stoppers inside of the wood to prevent the wires from falling through. I’m not sure what they were called but I know he got them at Home Depot! Then he just connected the wires together. We actually attached a base piece of wood to the ceiling before screwing in the remaining 3 pieces of wood to form a box (if that makes sense?) One of these days I’ll get around to detailed instructions! You can e-mail me with any further questions!
The chandelier looks great!! I have been seeing these types of lighting fixtures used a lot in decorating lately, and I’ve been wanting to make one. Has there been an updated post with detailed instructions? Tried searching on your blog, but couldn’t find any 🙁
Hi Natasha! Sorry, I’ve been horrible with posting instructions. I keep meaning to get around to it but I keep forgetting and it’s something I have to coordinate with the hubs. If you have any specific questions, you can e-mail me!
We are working on our new house and we have had a heck of a time trying to find neat fixtures. I’m jealous!
Hello – can you email me some additional instructions? How did you attach light sprocket? How do you attach wires to sprockets and lighting fixture? What did you use for the lighting fixture? Please help.
Hello Can you explain how did you attached the wood box to the ceiling , is your ceiling concrete ? thanks
Gorgeous! I am definitely making this! What size jars did you use? 24 or 32 oz?
I believe 24 ounces?? The standard size! 🙂
Awesome project! I would love to have the PB version, but have difficulty parting with the $400. Such a simple concept, and my Dad is a retired electrician who desperately needs a project to keeps his hands busy. With a home-cooked meal and a bit of sweet talk, I think this might be the ticket. Thanks for sharing
You’re welcome! Good luck!
I am making one just like this but have no idea how to mount it to the ceiling, how did you??
Did you ever post a tutorial for this light? We have a long galley style kitchen that has had 2 ugly flouresent lights and I would LOVE to replace them with this lovely light but don’t want to make a mistake when it comes to electrical wiring…
I haven’t posted a tutorial yet, but we will be rebuilding one soon and I plan on it!