• STYLE
    • Maternity Style
    • Try-Ons
  • BEAUTY
    • Hair
    • Makeup
    • Skincare
    • Favorite Products
  • HOME
    • DIY
    • Home Tour
  • FAMILY
    • Motherhood
    • Pregnancy
    • Breastfeeding
    • Exclusive Pumping
    • Favorite Products
  • Travel
    • Walt Disney World
    • Caribbean
    • USA
  • LIFESTYLE
    • Fitness
    • Food
  • SHOP
    • SHOP MY FAVES
    • SHOP MY INSTAGRAM
    • SHOP MY AMAZON
  • SHOP THE LMB COLLECTION

Lauren McBride

DIY + TUTORIALS

DIY Shutter Screen

February 6, 2015

DIY Shutter Screen - Lauren McBride

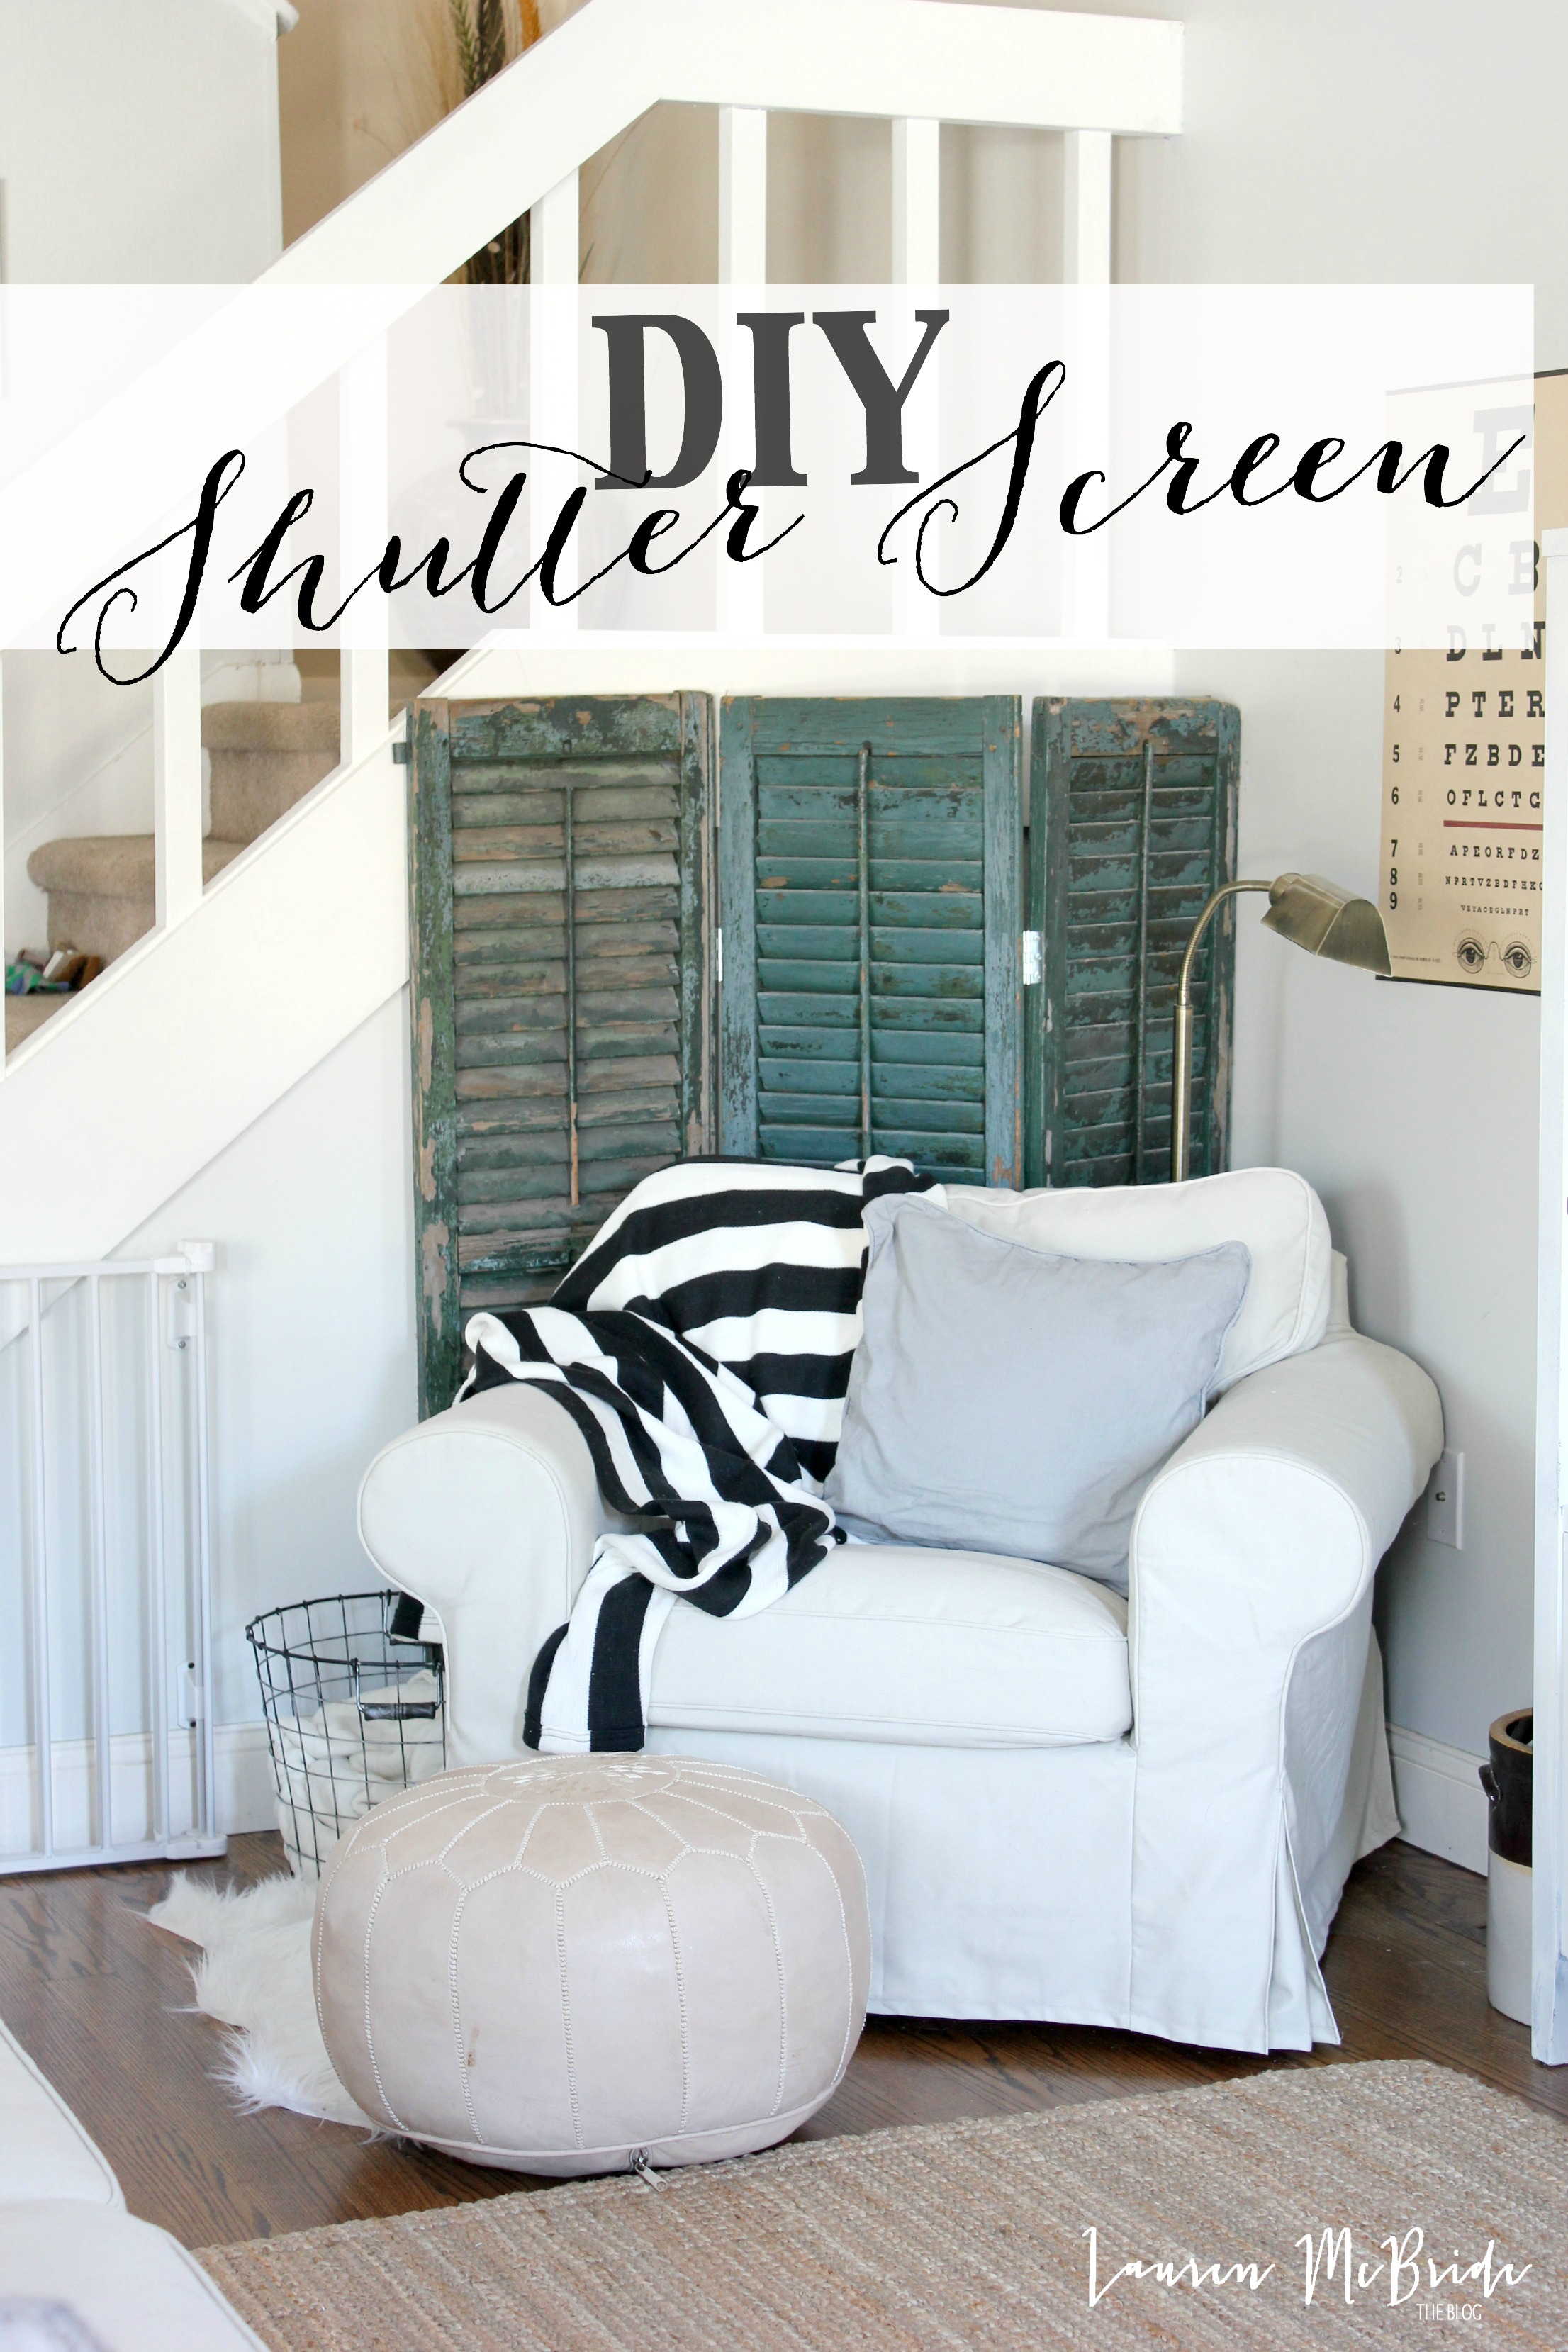
I posted a photo of this little corner of my living room on my Instagram the other morning and was asked about the shutters in the back of the chair. I realized this is like the easiest DIY project EVERRRR but a good one to post about here because of how simple it is! All you need are 3 vintage shutters and 4 of these hinge brackets.

These shutters were purchased off Craigslist a few summers ago. I’m sure if you search your local Craigslist ads, or even those tag sale groups on Facebook, you’re sure to find some! I loved the blue/green chippy paint on these. (If you have small children in your home, I would be weary that some old shutters, typically ones before 1970, may contain lead paint. To be safe, I recommend using this product to prevent any further chipping of paint to protect your little ones).

I wanted the shutters to stand up on their own, like a screen. You can get a better idea of how they stand with this photo:

DIY Shutter Screen - Lauren McBride

This required some strategic placement of the metal hinges. We placed two hinges facing the front between the center and right shutters, and two hinges facing backwards between the center and left shutters. The made the shutters fold like an accordion. That sounds really confusing, but you can see what I mean in the photo below. We placed the hinges about a third of the way from the top and bottom to balance things out.

DIY Shutter Screen - Lauren McBride

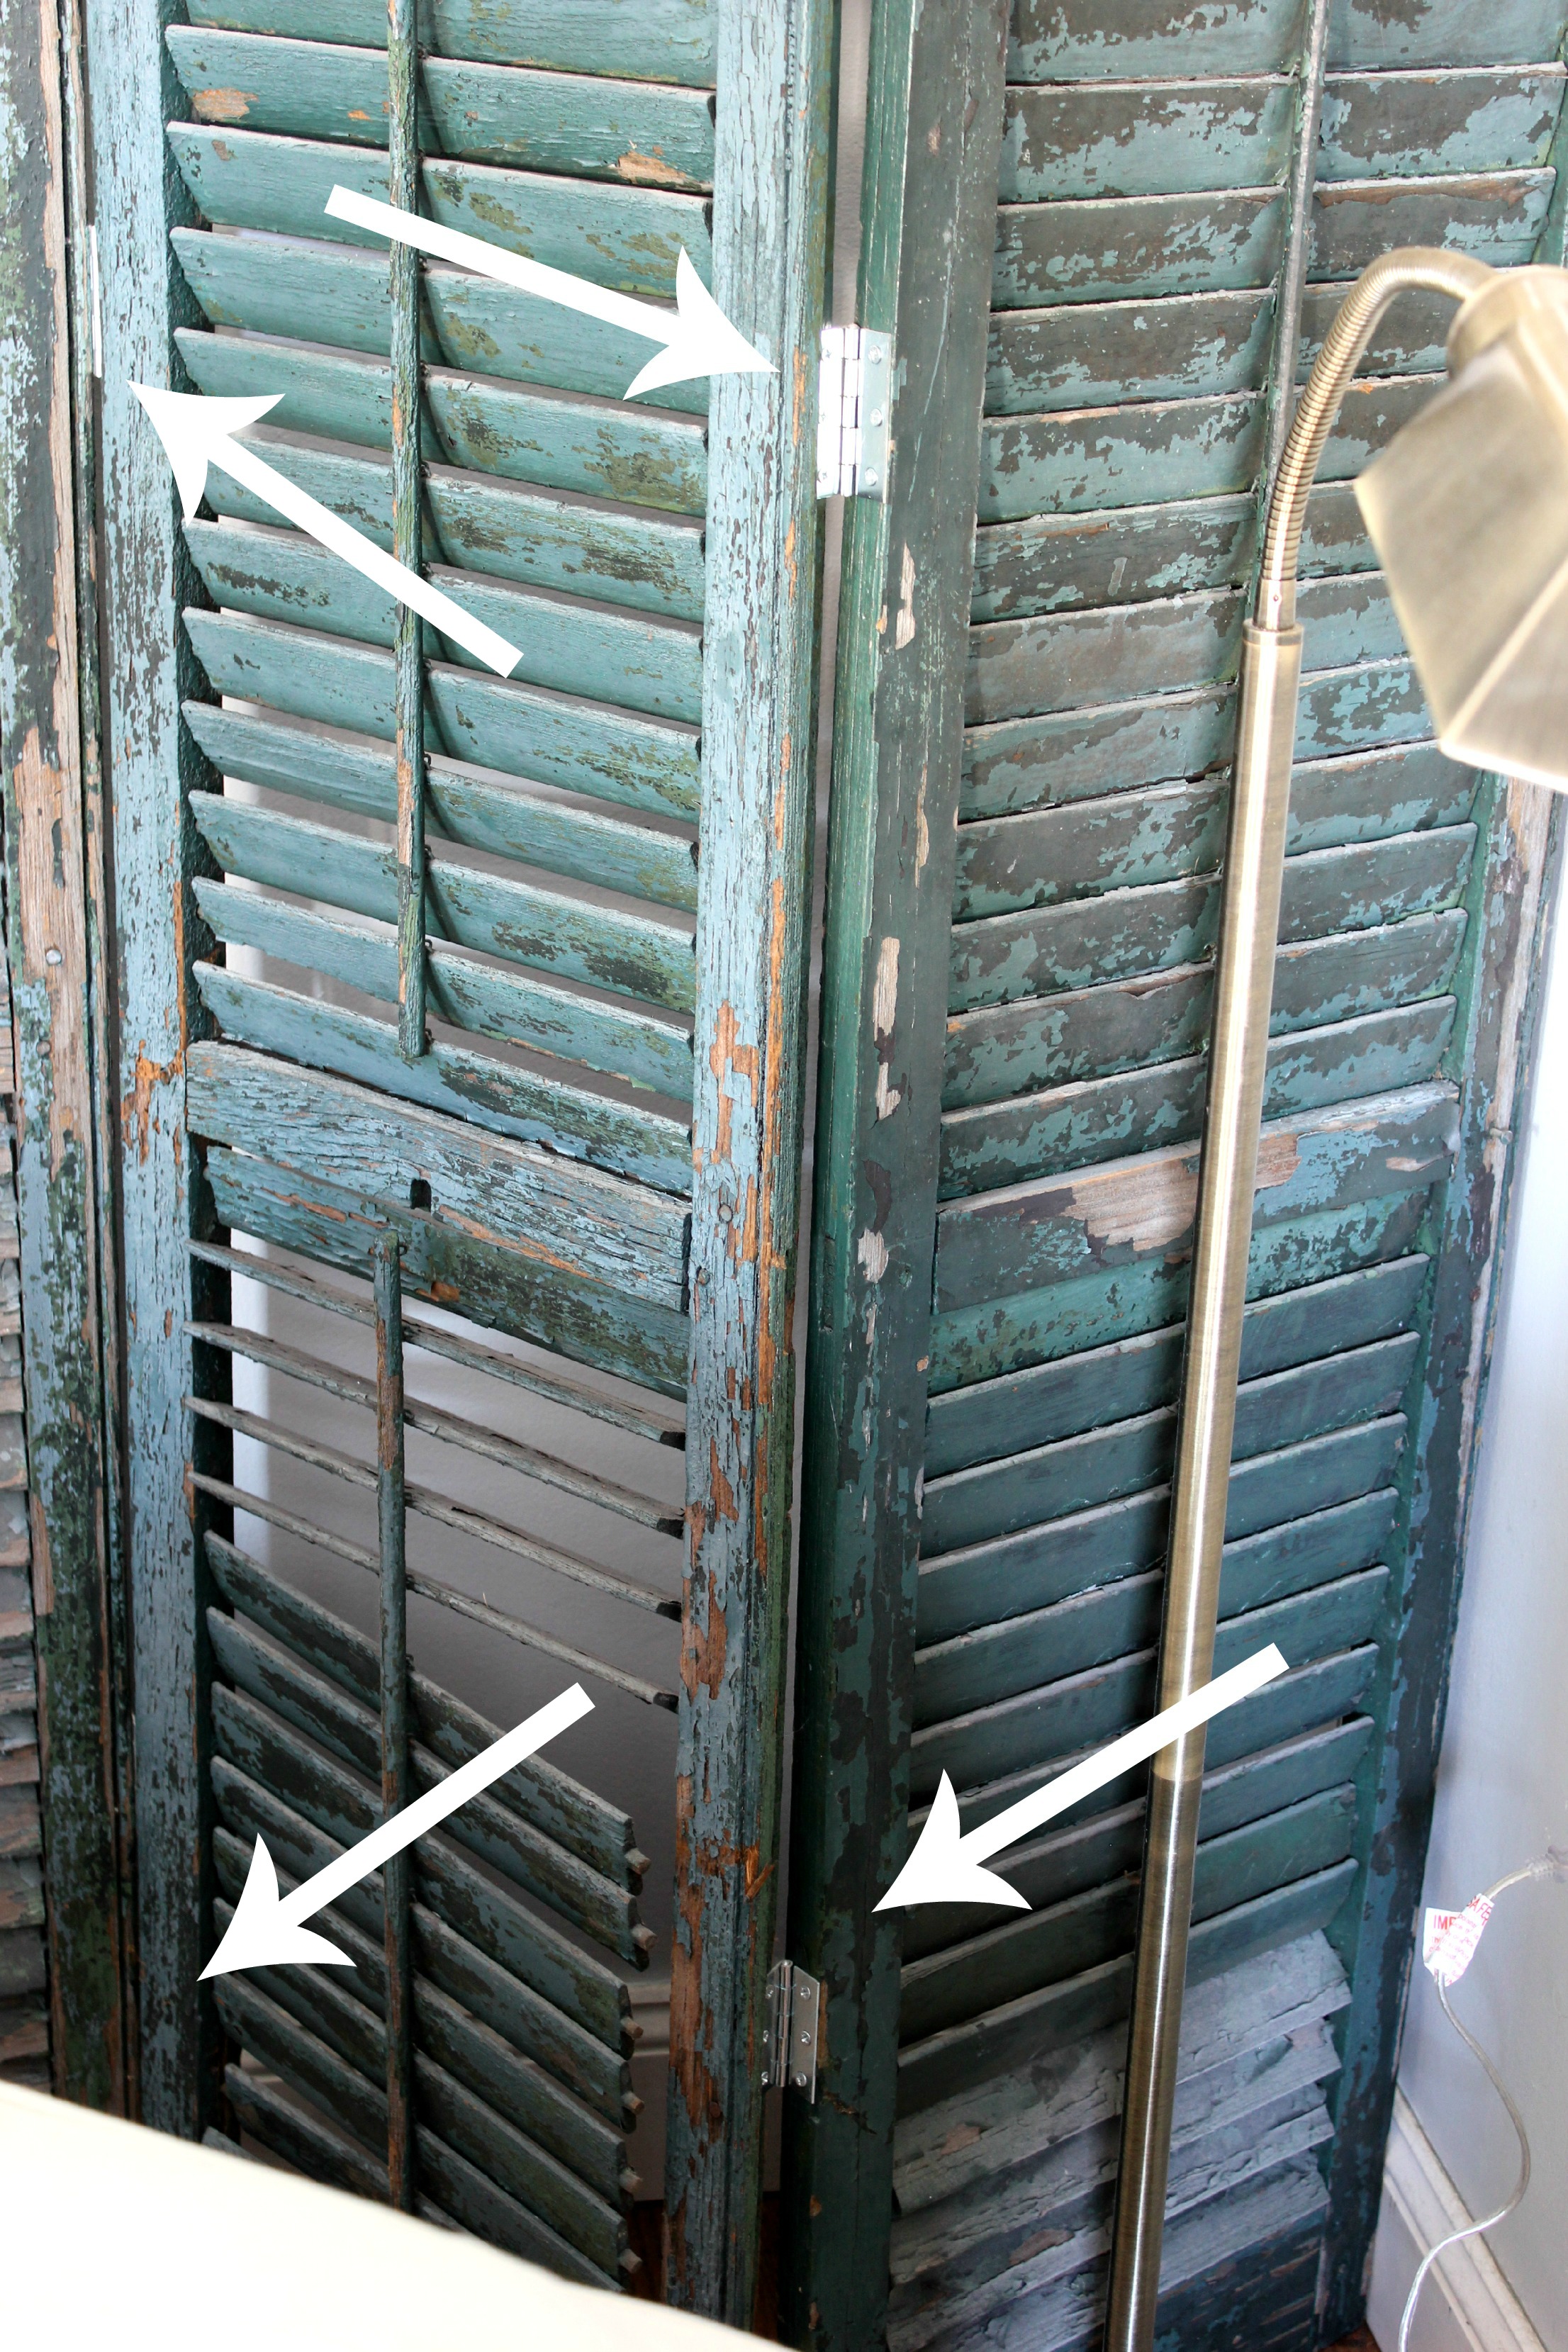
The shutters stand freely after that! It was a really simple project that took all of a few minutes. I really loved the result, and think it’s the the focal point of this little corner.

DIY Shutter Screen - Lauren McBride

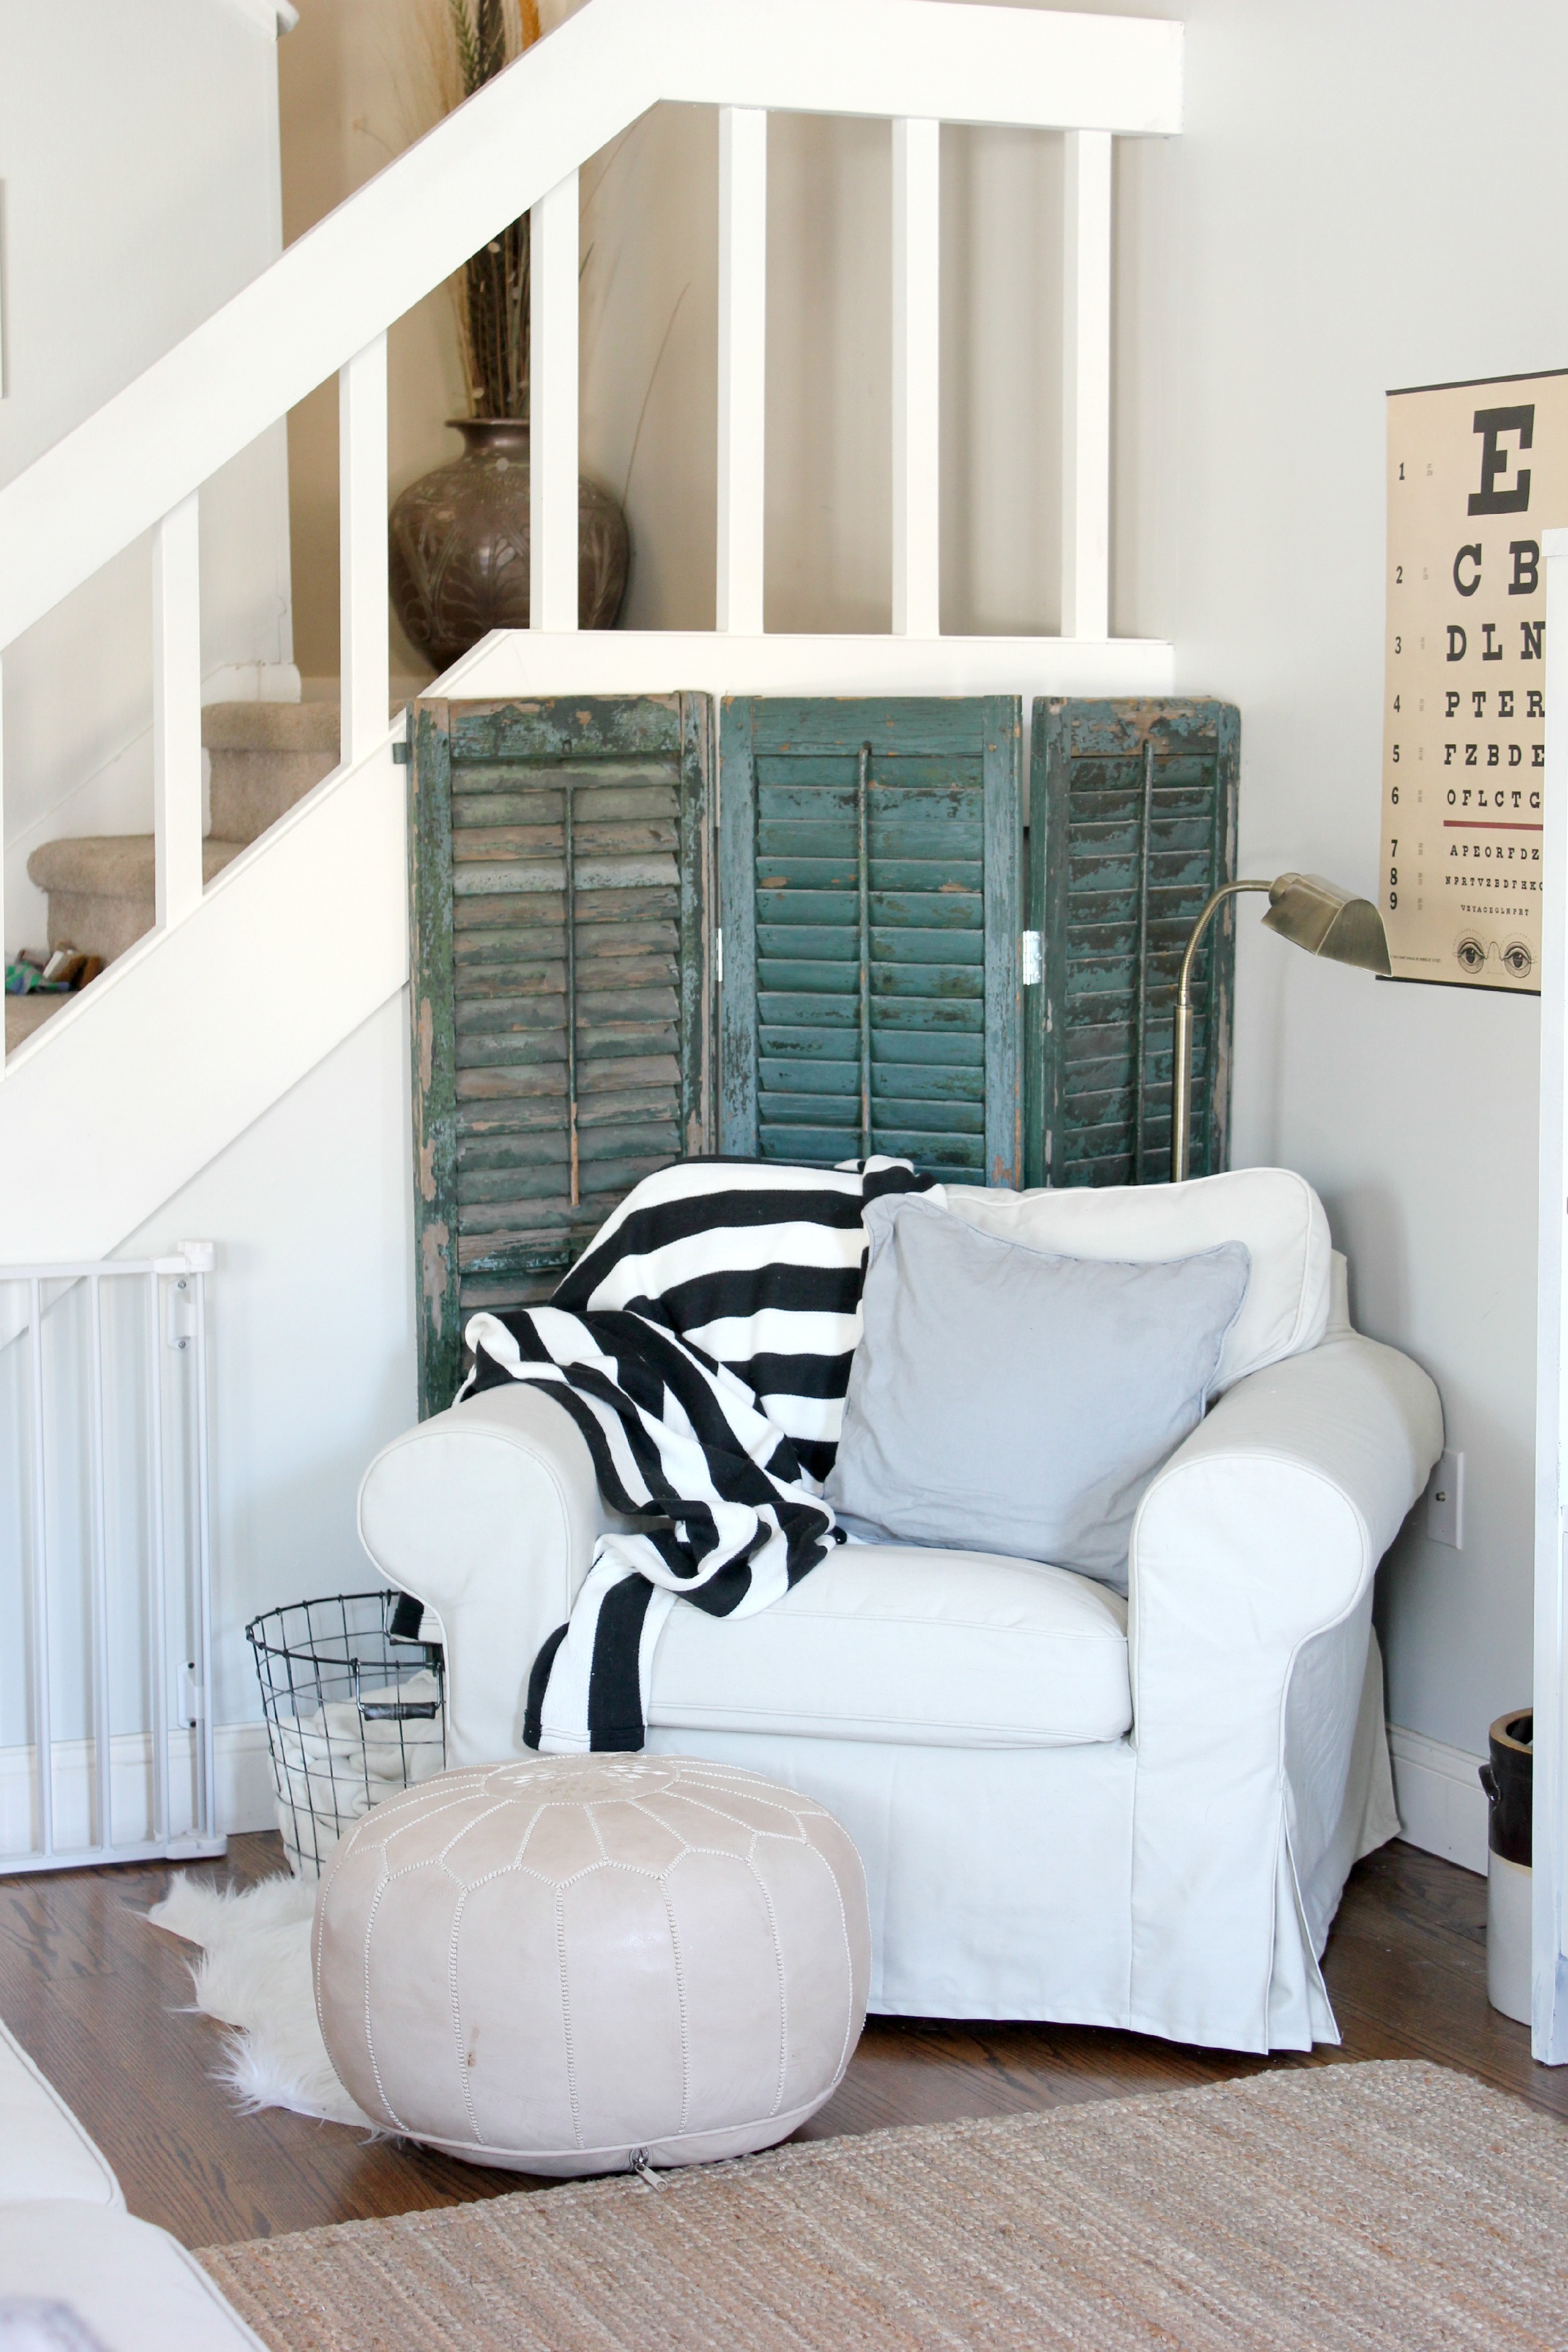
I’m hoping that made sense enough for you to replicate! It’s been a while since I shared a DIY around here πŸ˜‰ Happy weekend!

LMB-Signature

Share this post:

  • Email
  • Facebook
  • Twitter
  • Pinterest

Reader Interactions

Leave a Comment Cancel reply

Your email address will not be published. Required fields are marked *

Comments

  1. Lindi says

    February 9, 2015 at 5:36 pm

    Great upcycle for these shutters! LOVE how they look in the room πŸ™‚

    Reply
    • Lauren McBride says

      February 10, 2015 at 12:59 pm

      Thanks Lindi! Me too! Adds a little color, but blends with the neutral tones!

      Reply
  2. Gilly @ Colour Satuarted Life says

    February 11, 2015 at 9:36 pm

    Love this, such a simple idea but adds so much to the space!

    Reply
    • Lauren McBride says

      February 16, 2015 at 8:45 pm

      I agree! It’s my favorite spot in the room πŸ™‚

      Reply
  3. Brittany says

    February 12, 2015 at 7:28 pm

    What a simple but not simple looking project! Thats totally a good thing! I am all about simple but not letting people know and letting them be impressed! Now I am on the hunt for some shutters!! Thanks for the idea! Pinned!

    Reply
    • Lauren McBride says

      February 16, 2015 at 8:43 pm

      Hahahaha thank you! I’m all about simple too πŸ˜‰ Check Craigslist!

      Reply
  4. Angela, blue i style says

    February 12, 2015 at 10:58 pm

    This is such a great upcycle! I need to create a screen for our guest room, which is designed around all of our honeymoon photos from the Greek islands. A screen like this painted a vibrant Santorini-blue would be just perfect! I’d love to have you link up at our new DIY/decor link party, The Creative Circle: http://blueistyle.blogspot.com/2015/02/TheCreativeCircleWeek2.html

    Reply
    • Lauren McBride says

      February 16, 2015 at 8:42 pm

      Oh my gosh I bet that room is gorgeous!!!! I would love to go to the Greek islands!

      Reply
  5. Meredith says

    February 13, 2015 at 12:56 pm

    LOVE these! Thanks for sharing at the Monday Funday party this week! πŸ™‚

    Reply
    • Lauren McBride says

      February 16, 2015 at 8:41 pm

      Thanks Meredith!

      Reply
  6. Deb says

    February 13, 2015 at 2:27 pm

    Hi Lauren, What a great way to decorate a corner. Sometimes the easiest projects are the best. Thanks for sharing with the Pretty Pintastic Party.

    Deb

    Reply
    • Lauren McBride says

      February 16, 2015 at 8:40 pm

      Thanks Deb! I agree, the easiest ones are the best!

      Reply
  7. Carrie This Home says

    February 13, 2015 at 4:33 pm

    Any project that only needs two supplies is a winner in my book! Thank you so much for sharing this at the Frugal Crafty Home Blog Hop–this will be one of my features at our next party!

    Reply
    • Lauren McBride says

      February 16, 2015 at 8:38 pm

      Haha thanks so much! <3

      Reply
  8. Kristin says

    February 15, 2015 at 10:55 am

    Can we talk about how gorgeous this is? My office nook has a shabby chic feel and this makes me want to insert that vibe into more of my home. Featured this in my Sunday Funday faves! πŸ™‚

    Reply
    • Lauren McBride says

      February 15, 2015 at 10:43 pm

      Thank you Kristin! And for the feature! I always incorporate a little touch of shabby chic in every room πŸ™‚

      Reply
  9. megan @ NoSmallLife says

    February 15, 2015 at 3:33 pm

    What a great use of those shutters! That is such a cozy corner, I think I’d have a hard time ever leaving that chair πŸ™‚

    Reply
    • Lauren McBride says

      February 15, 2015 at 10:40 pm

      It’s the perfect little nook! Thanks for stopping by! πŸ™‚

      Reply
  10. Susan says

    February 15, 2015 at 7:25 pm

    Your shutter screen is absolutely amazing! You’d better keep an eye on it, or I’m sure someone will adopt it and take it home with them. Thanks for sharing at the This Is How We Roll Link Party at Organized 31.

    Reply
    • Lauren McBride says

      February 15, 2015 at 10:37 pm

      HAHA! Thank you so much! πŸ˜‰

      Reply
  11. Creatively Homespun says

    February 16, 2015 at 11:47 am

    Thanks for sharing at the Made from Pinterest link party! I’ve had these awesome shutters for years and couldn’t figure out the “right” spot. These are perfect!!

    Reply
    • Lauren McBride says

      February 16, 2015 at 8:37 pm

      Yay! Glad to inspire you!

      Reply
  12. Christine from So Domestically Challenged says

    February 16, 2015 at 3:03 pm

    That looks so cute! It completely changes that area around the chair! Love it!

    Thanks so much for posting to the Oh My Heartsie Girls link party! I hope we see you again this Wednesday!

    Reply
    • Lauren McBride says

      February 16, 2015 at 8:35 pm

      Thanks so much Christine!

      Reply
  13. Sarah Halstead says

    February 16, 2015 at 8:12 pm

    That is seriously precious! Featuring you tomorrow on Dream Create Inspire!

    Reply
    • Lauren McBride says

      February 16, 2015 at 8:34 pm

      Thanks so much Sarah!!!!! <3

      Reply
  14. Allison says

    February 17, 2015 at 10:53 pm

    So excited to feature you tomorrow on A Little Bird Told Me Link Party!

    Reply
    • Lauren McBride says

      February 22, 2015 at 8:25 pm

      Thanks for the feature Allison!

      Reply
  15. Jennifer Dawn says

    February 18, 2015 at 12:07 am

    What a great project! It really adds a lot to that party of the room. I just wanted to let you know that it is being featured at this week’s link party! http://www.thelifeofjenniferdawn.com/2015/02/a-little-bird-told-me-link-party-128.html

    Reply
    • Lauren McBride says

      February 22, 2015 at 8:28 pm

      Thanks Jennifer, I appreciate the feature!

      Reply
  16. Christina @ I Gotta Create! says

    February 18, 2015 at 7:17 pm

    Love that color and chippy look. Featuring you at the party this week! Thanks for linking up. <3 Christina

    Reply
    • Lauren McBride says

      February 22, 2015 at 8:22 pm

      Thanks Christina, and thank you for the feature!

      Reply
  17. Marilyn says

    February 18, 2015 at 9:08 pm

    We featured you’re awesome project at the Project Stash link party! Thanks for linking up last week and we’d love to have you join us again this week!

    Reply
    • Lauren McBride says

      February 22, 2015 at 8:18 pm

      Thanks for the feature Marilyn!!!!!! xo

      Reply

Trackbacks

  1. 12 DIY Projects to Try | Monday Funday Link Party - That's What {Che} Said... says:
    July 25, 2016 at 1:46 am

    […] Shelves | Shutter Screen | 10 Minute Coffee Soap | Fabric Lined Drawers Faux Succulent Wreath | Feather Wall Art | Rosemary […]

    Reply
  2. Spring Ready Ideas and a $100 Kohl's Gift Card Giveaway - Take Time For Style says:
    March 6, 2019 at 1:10 pm

    […] Lauren McBride’s DIY shutter screen makes me want to redecorate so I can make one that will go in my own space! Gorgeous! […]

    Reply
Previous Preppy in Leather
Next I Crave Jewels Giveaway

Related Posts

VIDEO: How To Get Beachy Waves Using a Curling Wand...

Pottery Barn Inspired Mason Jar Chandelier

How to Get Your Husband to Build You a Factory Cart Cof...

Dining Room Update: Chandelier Makeover

Primary Sidebar

As Seen On:

  • Instagram
  • Instagram Stories
SHOP THE

LAUREN MCBRIDE COLLECTION

#LMBXQVC

Subscribe

Subscribe to the list for exclusive content from Lauren! From exclusive sales and codes to the best things you can find across the web in home decor, easy style and motherhood.

SHOP

MY AMAZON

FAVES
Early mornings just feel different in paradise. β˜€οΈ We have AC in all the bedrooms here for you, but I still need to sleep in minimal clothing when it’s hot out! I love this bralette and brief set (briefs not shown as a courtesy to you 🀣) from @calvinklein best sellers! Super comfy for lounging and sleeping (yes I wear it to sleep, haha). Linking them over in my LTK! #ad #mycalvins

#liketkit 
@shop.ltk
https://liketk.it/3IXUx
on instagram@laurmcbrideblog

FOLLOW ALONG ON SOCIAL

  • ABOUT LAUREN
  • COLLABORATE
  • DISCLOSURES
  • F.A.Qs.
  • PRESS
  • CONTACT
on pinterestfollow pins

AMAZON AFFILIATE DISCLAIMER

We are a participant in the Amazon Services LLC Associates Program, an affiliate advertising program designed to provide a means for us to earn fees by linking to Amazon.com and affiliated sites.
  • ABOUT
  • CONTACT
  • COLLABORATE
  • LEGAL TERMS
  • PRIVACY POLICY
Copyright Β© Lauren McBride | Design By: MLL Branding +Design Studio
loading Cancel
Post was not sent - check your email addresses!
Email check failed, please try again
Sorry, your blog cannot share posts by email.