
AFFILIATE DISCLAIMER: This page contains some affiliate links, which means we may receive a small commission if you purchase through our links (at no extra cost to you). We only recommend companies that we have personally used, love, and trust. For more information please check out our disclosure policy HERE!
Are you ready to learn how to plank walls, and do it for cheap? This post is everything you need and more, be sure to save it!
My apologies for the delay in home posts, because I know you guys have been itching for them! I’ve yet to post much because we are still in the process of changing things and nothing is entirely complete at this point. But I can assure you things are coming, so sit tight!
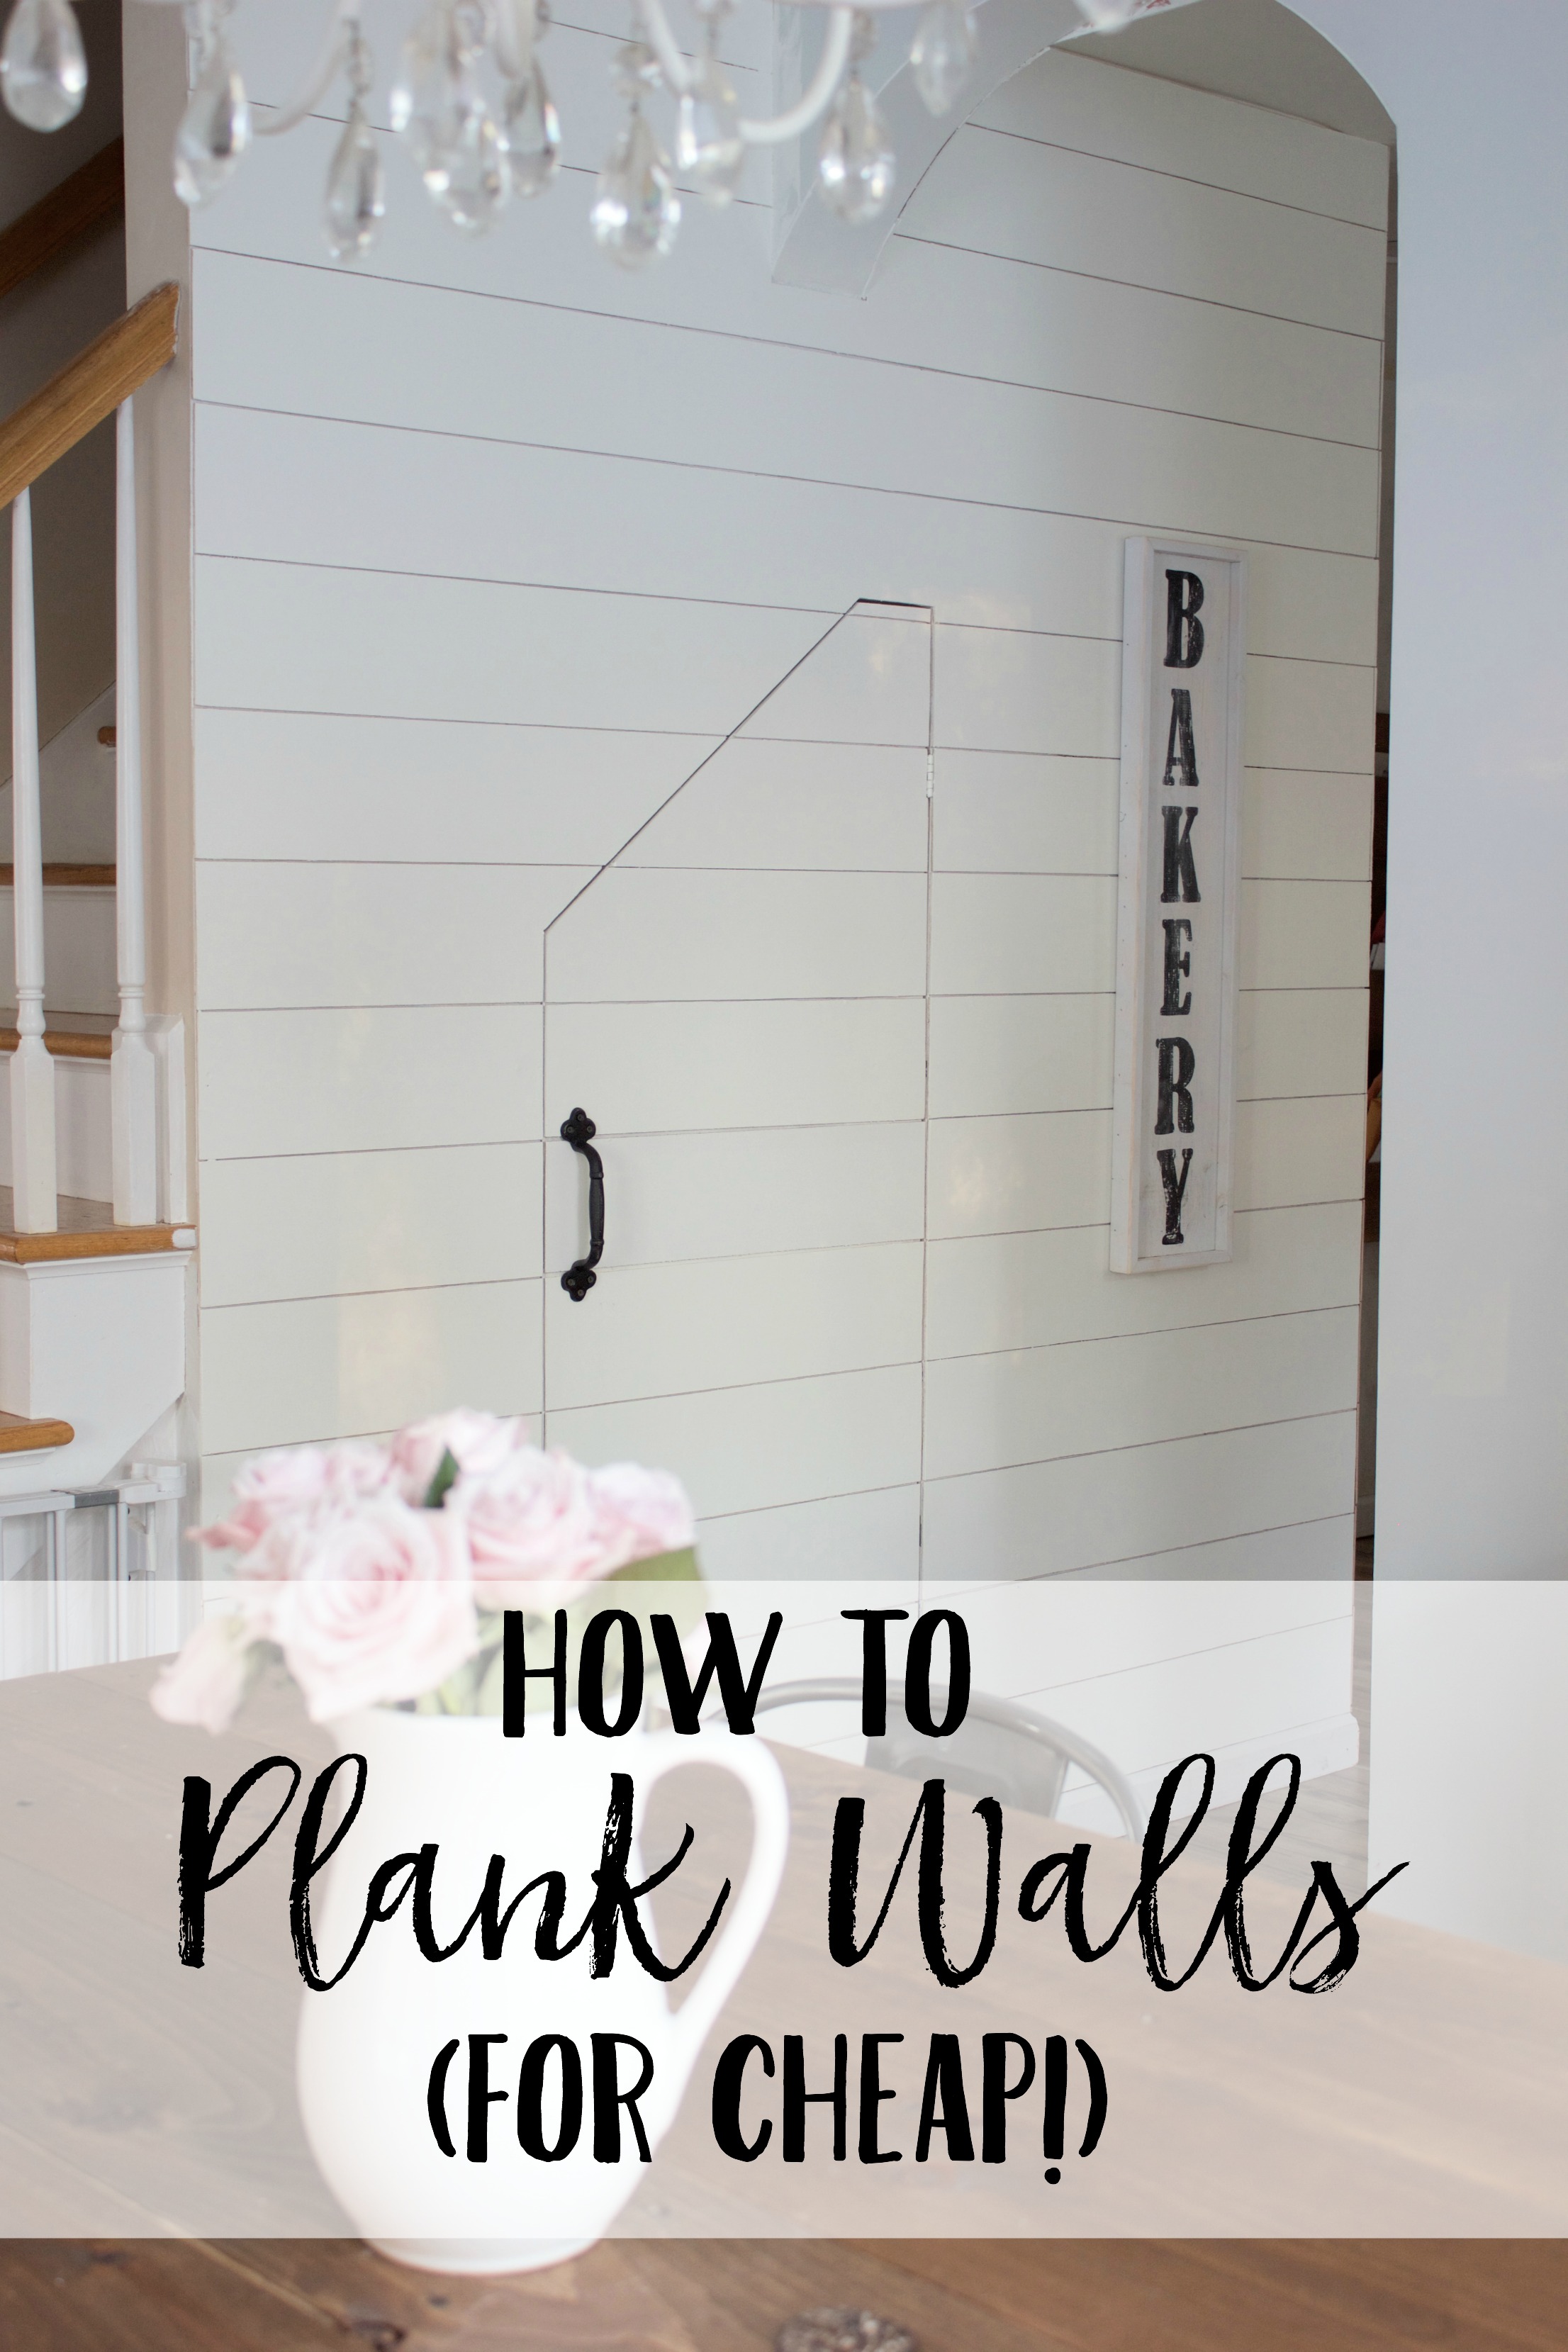
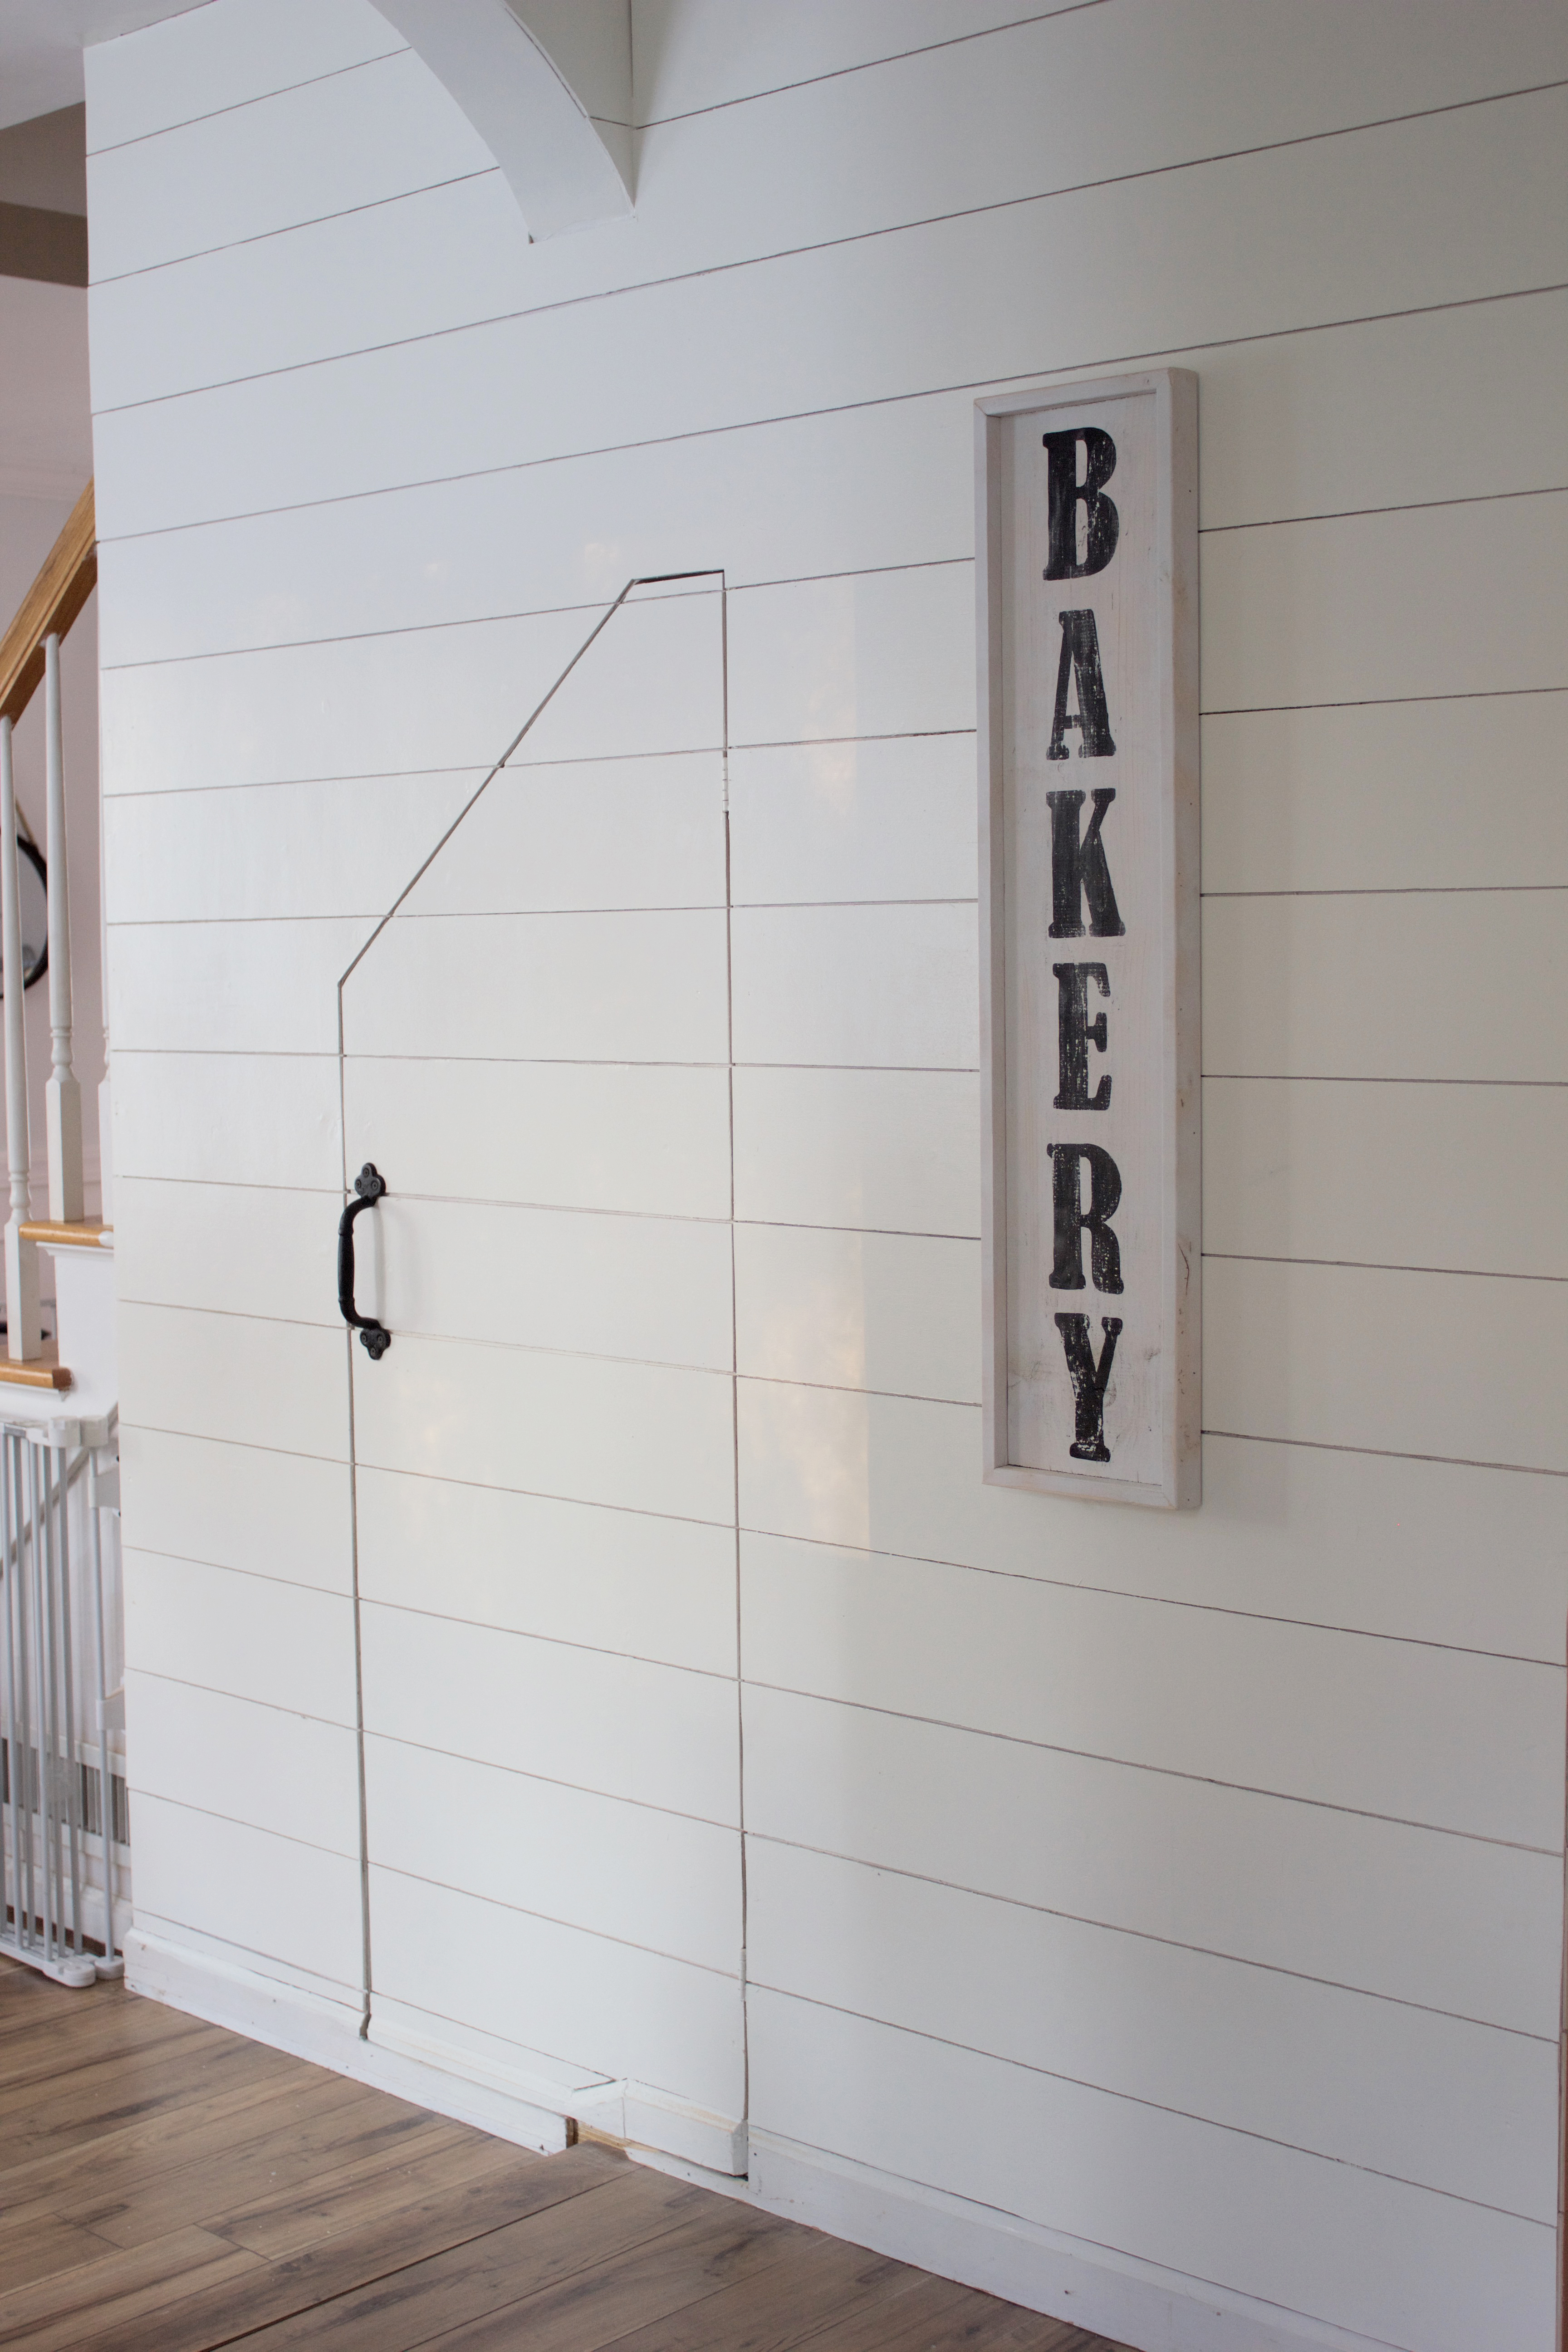
How To Plank Walls
If you follow me on Snapchat (laurmcbrideblog), you know our kitchen has been a beast of a makeover. We chose to do the majority of things ourselves, which is cost effective but also REALLY time consuming. And with two littles and a husband who works full time and me working on the weekends…the time is super minimal. Shout out to my hubs who’s been burning the midnight oil trying to get this done!
If you’ve been a long time reader, you know that Joanna Gaines is basically my spirit animal, so when we bought this home my immediate thought was “SHIP LAP!” Until I actually saw the price of shiplap. And well, I couldn’t afford shiplap. At least the shiplap that I came across. So in true Lauren McBride fashion, I decided that we would find another way to do it cheaper. Today I’m sharing with you how we planked our kitchen walls for cheap. Of course I forgot to take instructional photos, but you honestly don’t need much instruction. This process, how to plank walls, is pretty simple, just time consuming.
How To Plank Walls: Materials
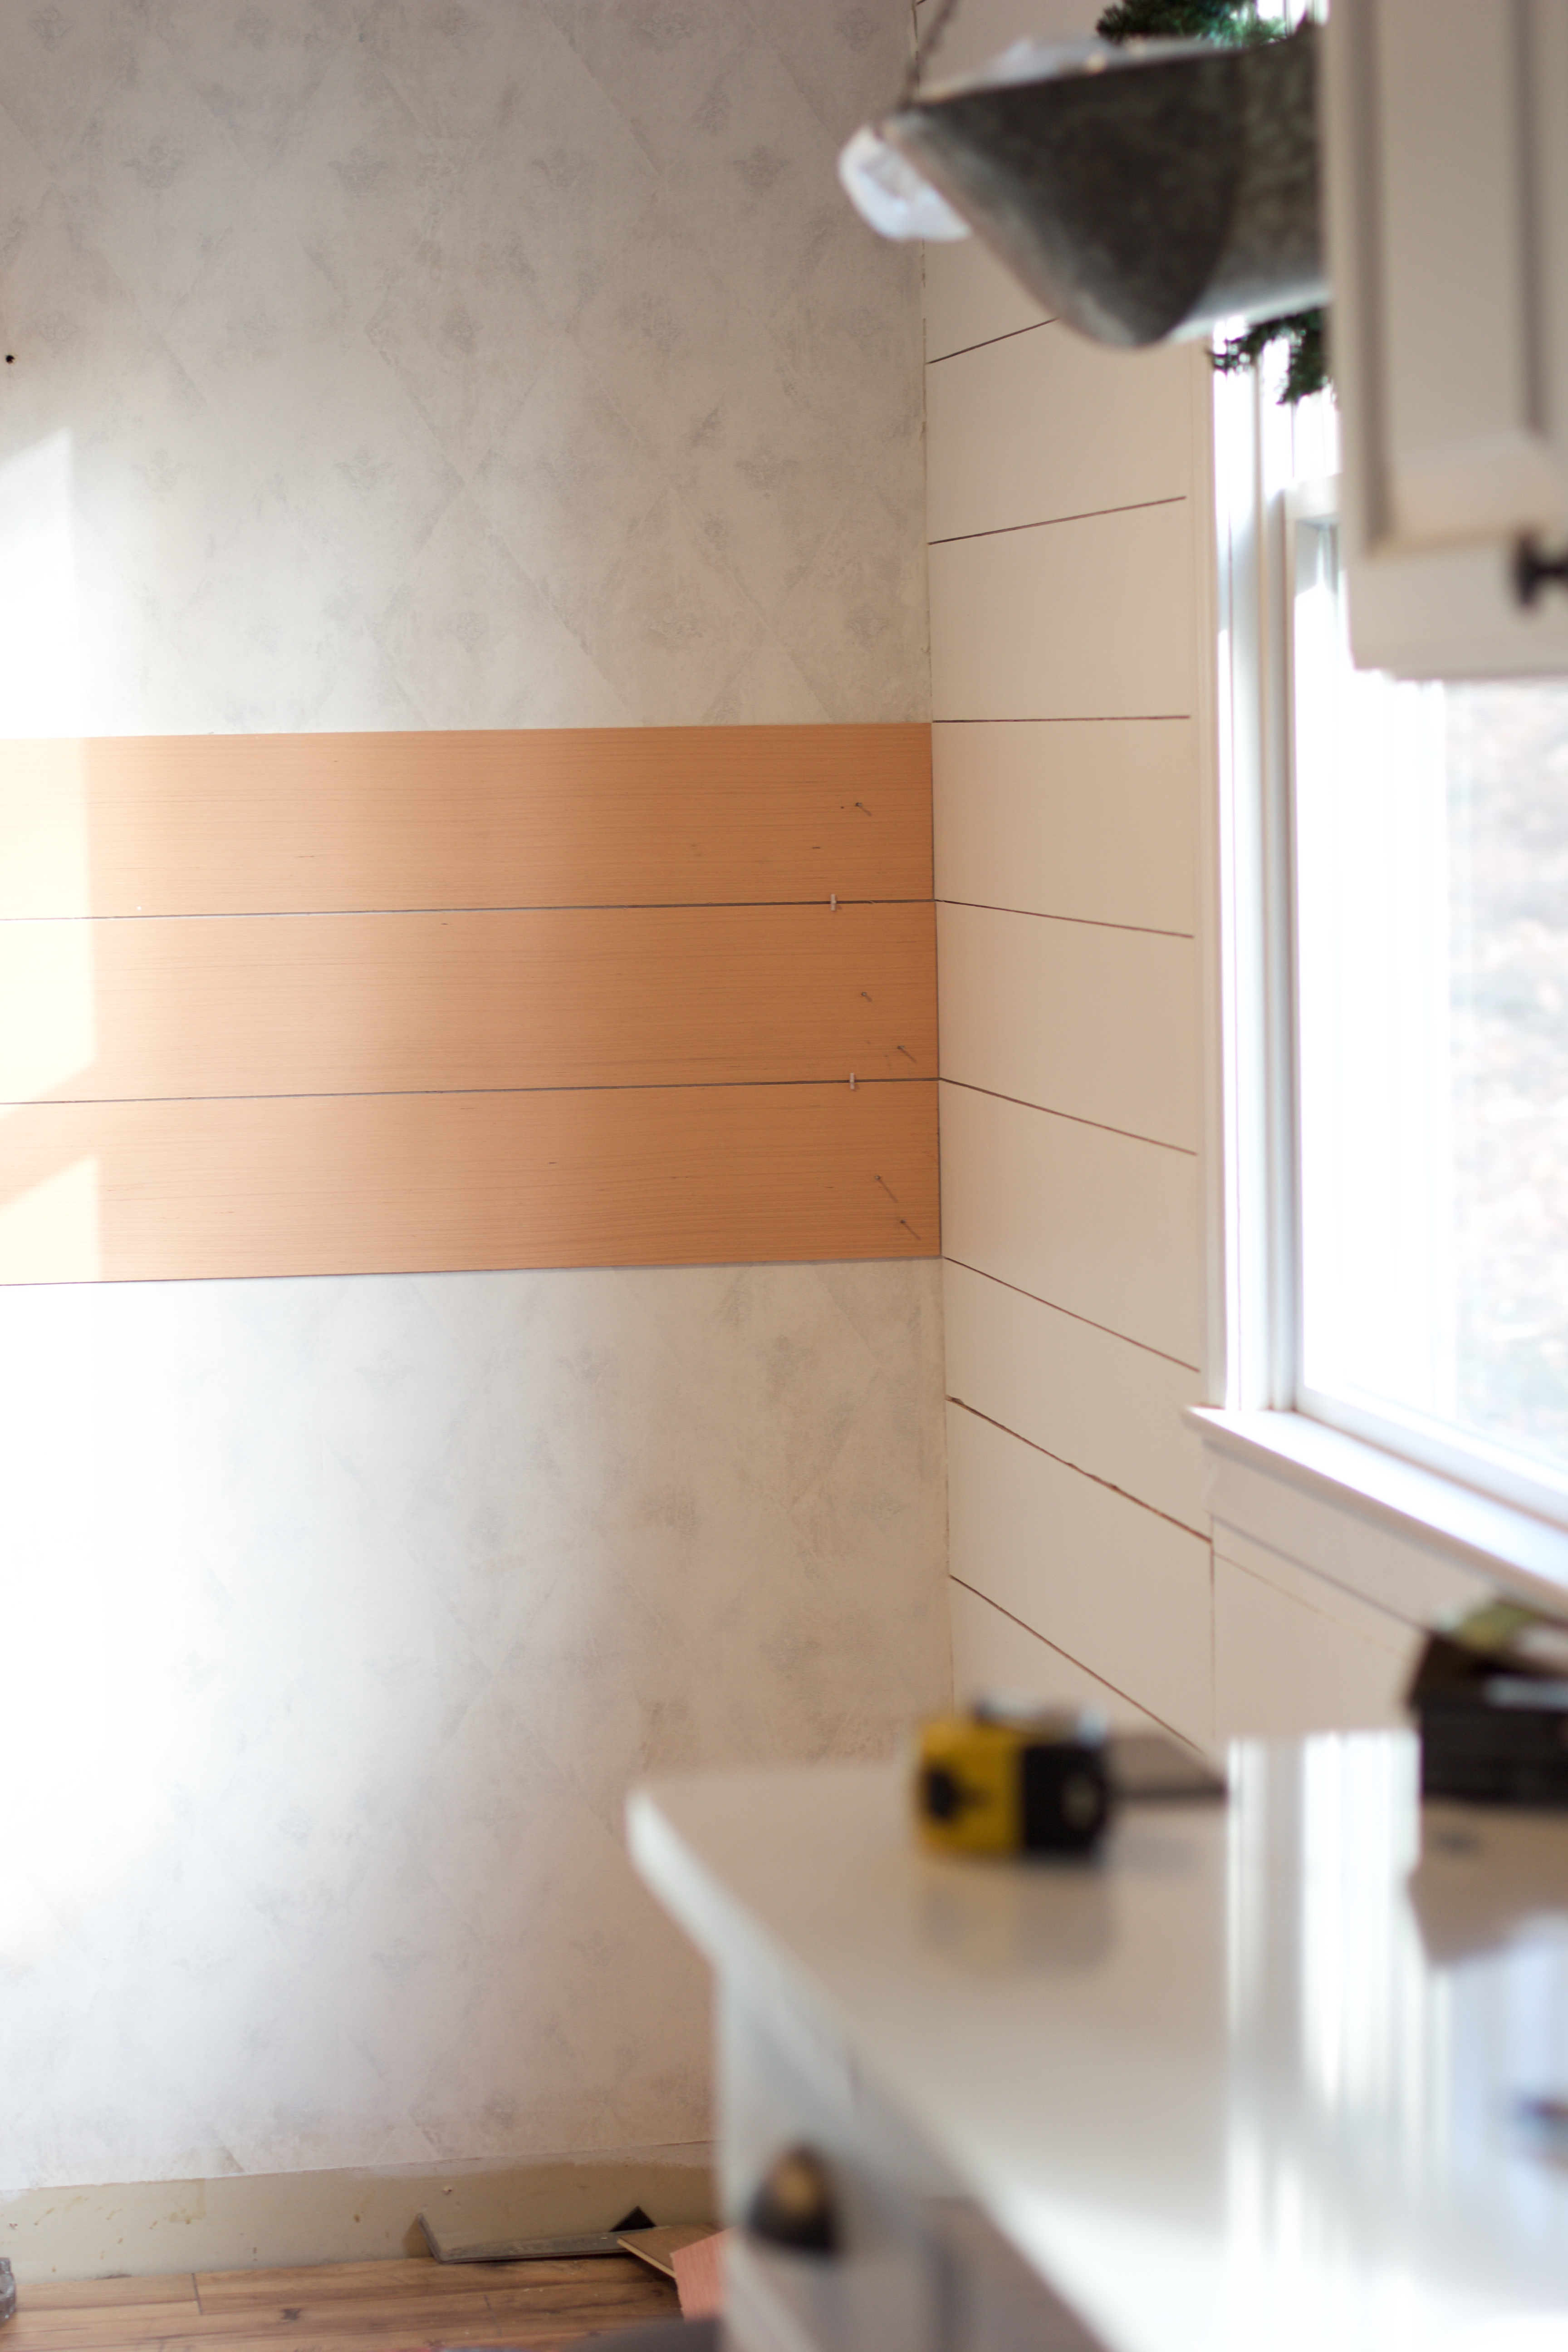
These are the exact pieces of plywood we used for this project. Yup, you read that right…plywood! You can get them at your local Lowe’s, and they’re only $14 for a piece measuring 4’x8′ and 1/4″ thick. I believe we used a total of 7 or 8 for our entire kitchen, which is significantly cheaper than purchasing actual shiplap. Ask someone at Lowe’s in the building department to rip each piece into 6″ strips. You’ll get a total of 8 planks out of one piece of plywood.
While at Lowe’s, pick up some Liquid Nails and these little spacers. You don’t necessarily need the spacers; they’re about the same width as a nickel. My husband just chose to not listen when I said we could use nickels. 😉 He also grabbed some finishing nails.
How To Plank Walls: The Process
Before we started anything, we painted the walls one coat of white paint. This was because we were leaving a gap in between each plank, and I didn’t want the hideous paint color and wallpaper to show within those gaps. I didn’t paint the walls very nicely; it was a very haphazard coat of paint because the planks would be covering most of it.
The process was actually quite simple. It’s like a game of Tetris, but easier. And while a saw does make this go quicker, my husband used a sharp razor blade for the majority of the planks (because our saw is LOUD and he worked on this at night). You can choose to start from the ceiling or floor, but we chose to start at the level of our countertops because the planks are also purposing as our backsplash. It’s really just a matter of measuring each piece, applying some liquid nails to one side, sticking it on the wall, and securing with finishing nails. As he added planks, he would use the spacer to leave a small gap in between each plank to get that shiplap look. The only challenging part is cutting around outlets and door jams, but other than that the process is pretty easy. Also, be sure your planks match up in the corners! And remember to take accurate measurements!
Once complete, we filled in nail holes with some wood putty and then sanded everything down smooth. We used three coats of white paint (surprisingly, we didn’t need primer. I thought the wood coloring might bleed through, but it didn’t). The white you see is Benjamin Moore Simply White, and we chose the same finish as trim paint. We also caulked around our countertops and the ceiling, as well as the corners where the planks met, that way the finish was seamless.

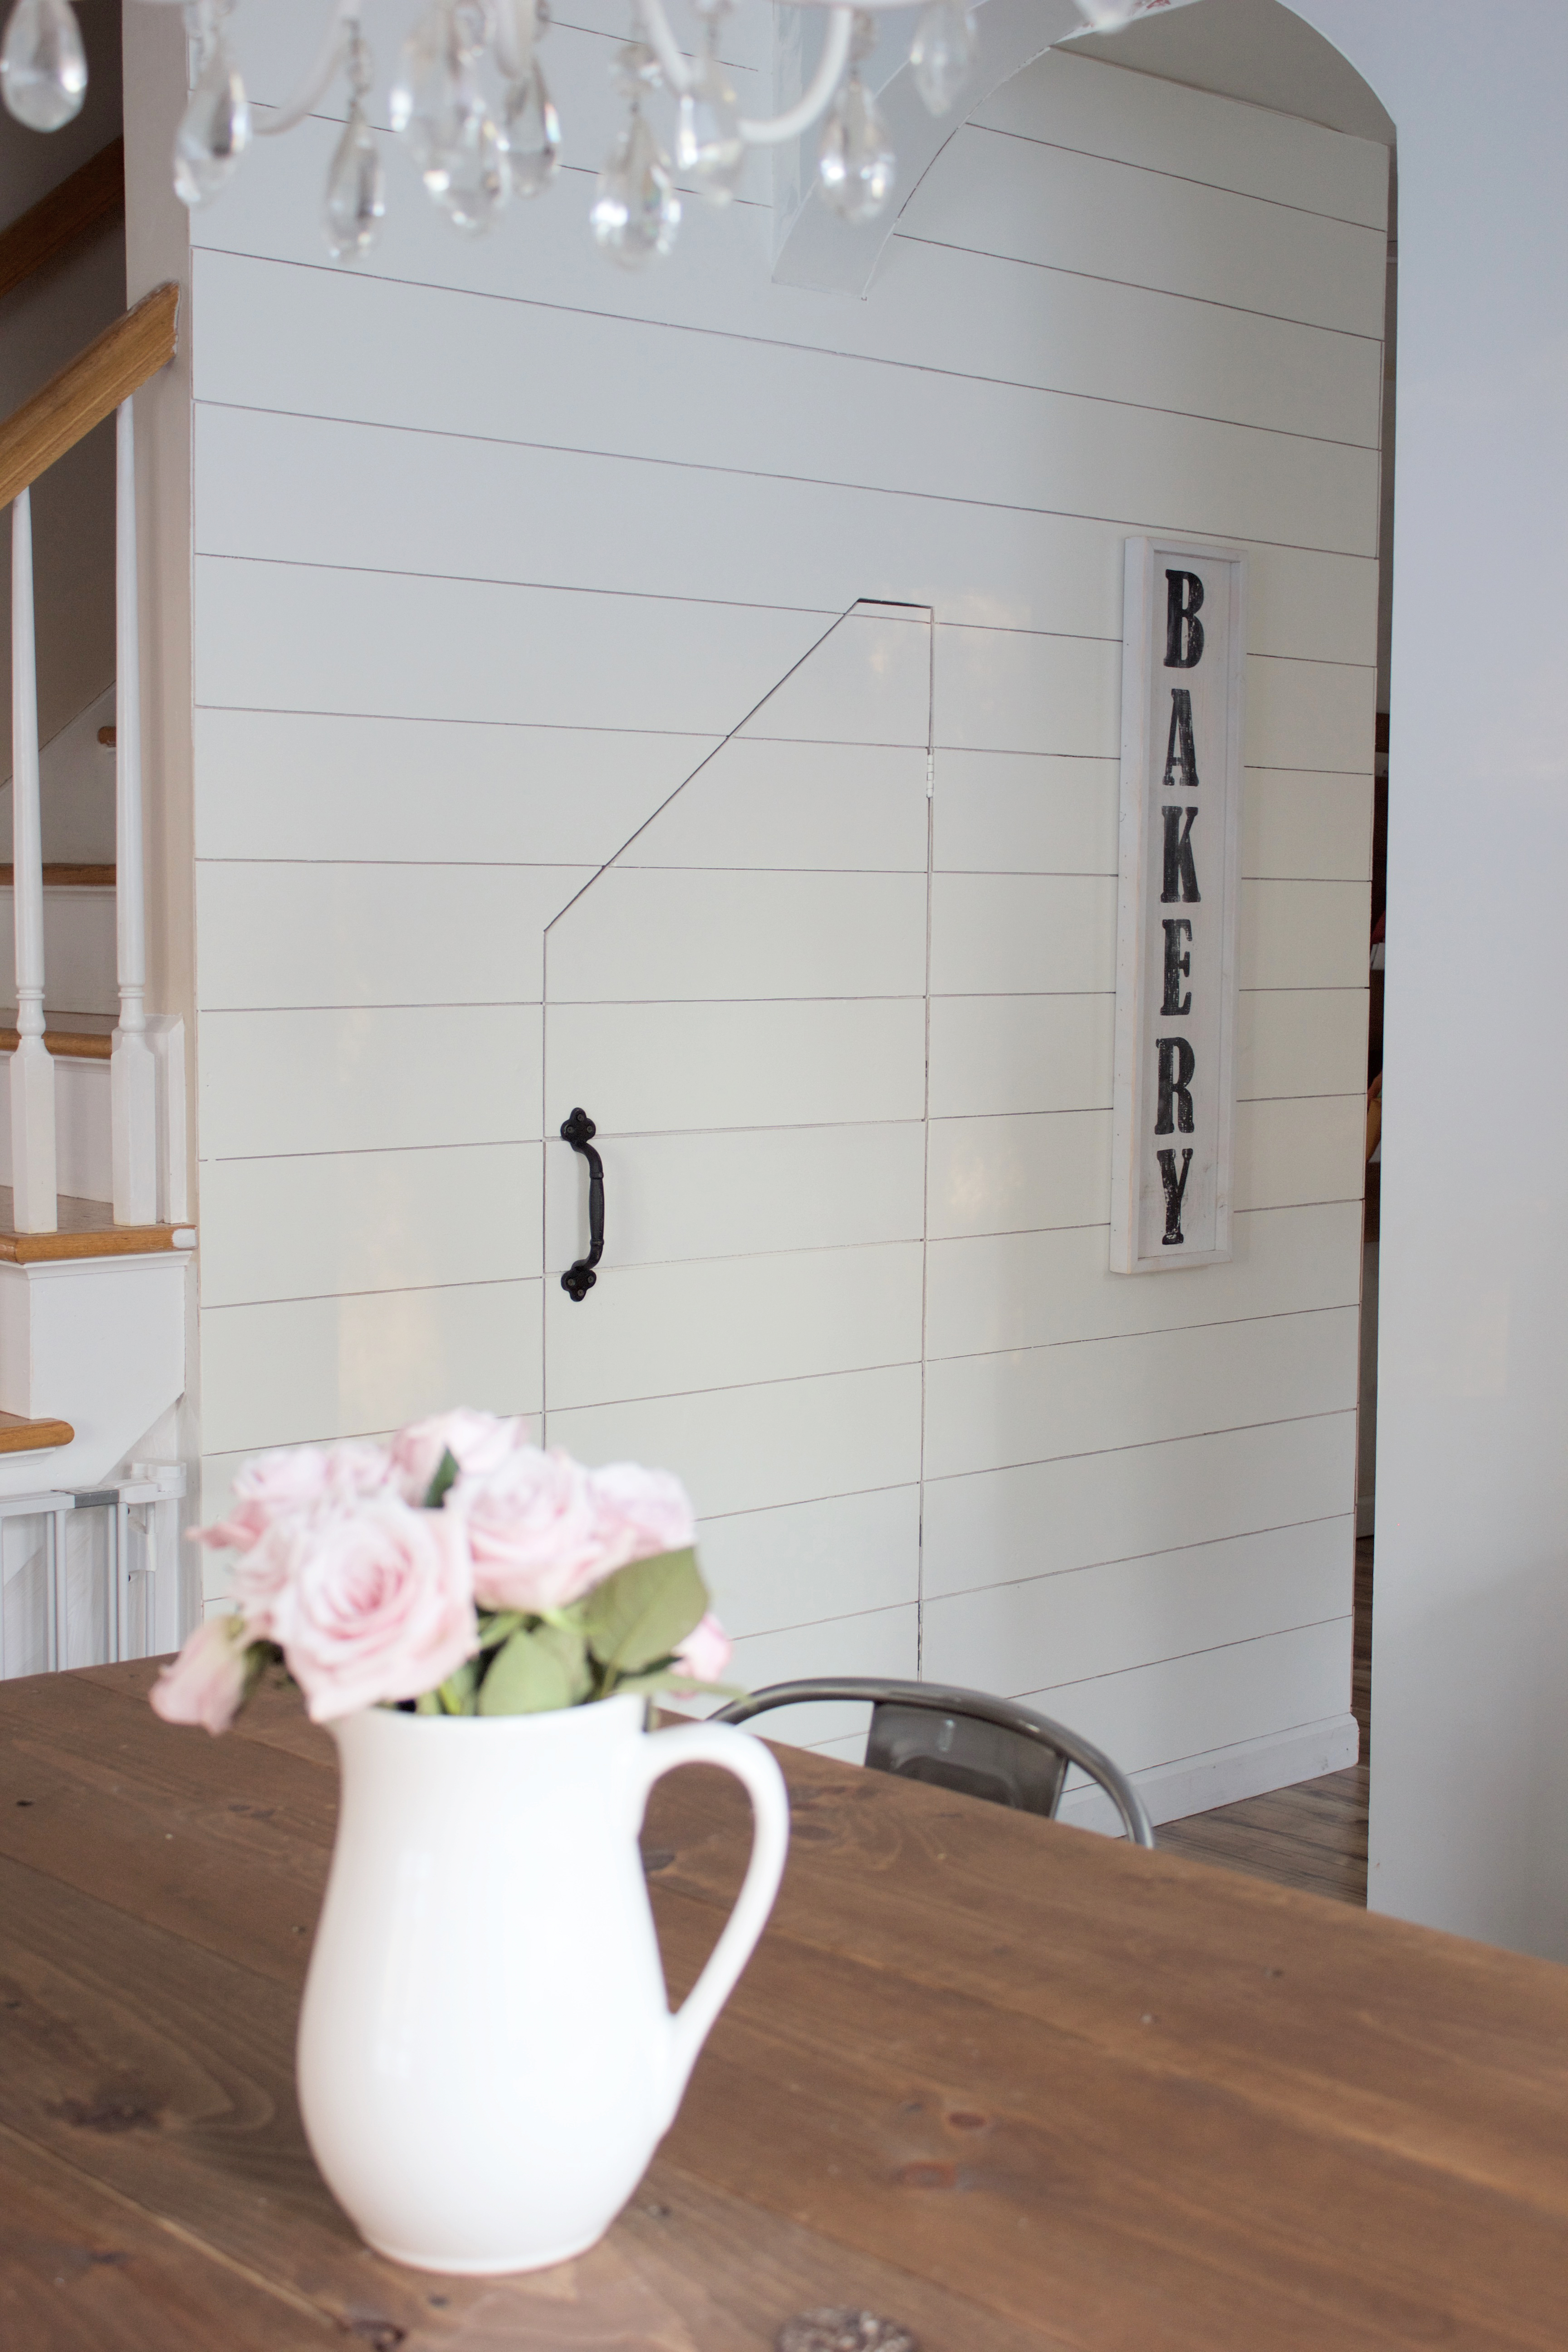
Bakery sign: Etsy // Vintage door pull: rel=”nofollow”Etsy
I’m only showing you this one wall for now because the rest of the kitchen isn’t complete just yet, but if you follow me on Snap you can get a sneak peek on how to plank walls!
If you have any questions about the process, ask me here and I’ll update this as needed in case others have the same questions as you! Happy planking!

Love that look!
http://www.livingpaula.com
Great job, looks amazing! Thanks so much for sharing on craft schooling Sunday!
Thank you!
That is beautiful!
Thank you!
This looks great. Awesome job!
Thank you!
This is SO cute! I love the look! We have a wall in our living room that is kind of weird so I never know what to do with it in terms of hanging things.. I think this would be such an awesome solution!
Thank you! Definitely give it a shot! It adds so much to the room!
Gorgeous!!!! I can’t believe that’s plywood, it turned out great! I can’t wait to see your finished kitchen!
Thank you! Can’t wait to reveal it!
Looks really great! good job.
Thank you so much!
It looks great! I might try this on a wall in my living room :o]
Thanks for linking up to Craft Frenzy Friday!
Tania
You definitely should! 🙂
It looks amazing! I love how you did the little door the same way. It matches up perfectly!
I absolutely loooove this look project Lauren! You guys did a fantastic job and it turned out so beautifully 🙂 Thanks for linking this up at the Bewitchin’ Projects Block Party last week. You are one of my Featured Picks this Sunday over at Recreated Designs and will also be featured on Facebook on Monday. Hugs, Lisa
Great project! Looking forward to seeing the rest of your kitchen.
Love it! Pinned and tweeted! Thank you so much for sharing this with us at our linky party. We hope to see you next Monday @ 7 because we can’t wait to see your new creations! Happy Saturday! Lou Lou Girls
So fresh, I love it! Thanks much for bringing this by Throwback Thursday this week and hope to see you next Thursday. I’ll be pinning it to our TBT board!
Mollie
I TOTALLY love this tutorial!! Oh my goodness it is so stinking cute!! I am definitely trying this THIS weekend!
Thank you so much for linking up with the Weekend Wind Down Link Party! We have chosen you to be one of our features! This tutorial will be rotated throughout our Twitter, Pinterest, Facebook and G+. You will be featured on my blog as well this coming Friday! So make sure to come back and link up another great article!
Weekend Wind Down Link Party goes live Friday nights at 6pm!
xox
-Britni
Love it and my mind when straight to Joanna & shiplap as soon as I saw this in the Dream Create Inspire link up. I can totally relate to the slow kitchen makeover. We have the same issue since we’re also trying to do as much of it ourselves and juggle 2 kids. It’s craziness. Looking forward to seeing how your kitchen turns out!
Shared a link to your post in my roundup today. Thanks for linking up to Dream Create Inspire!
Terrific job Lauren! Thank you for sharing with us at Create • Share • Inspire! We hope to see you back this week. xo
I was wondering what finish you used for the paint, flat or satin? I am about to plank a wall in my living room. Thank you.
Your kitchen is looking fantastic!!
We used satin! We used the same paint as our trim!
I love this look! It turned out absolutely amazing! I am definitely pinning this for future reference- I’ve been wondering how I could do that here since we don’t have real shiplap. Thank you so much for linking up to the Handmade Hangout! I’ll be featuring these on my blog (occasionallycrafty.com) when the new linky goes live at 6pm ET. I hope you will stop by and link up again!
It looks great! My husband and I want to do this in our office. Of course, owning a fixer upper and doing it yourself that means it will happen next year 😉 You seem like you understand the struggle! Ha!
I love how it turned out. Thanks for sharing at the Inspiration Spotlight party! PInned & shared
So beautiful! I’m thinking of doing this as well. Did you do anything different for behind your sink since that party may get wet? I worry about the boards warping/water ruining the paint.
Thanks!
Sydnie
Hi Sydnie! We didn’t! We just caulked along the counertops!
Love this look! Beautiful job!! I will be planking a long wall in my laundry room. I was wondering if you would line the strips up to match perfectly and then caulk the seams if they fall mid-wall?
Thanks!!
We’ve done this in a few rooms, and I didn’t bother caulking the seams when the walls were too large for one board! I think it adds to the look 🙂
Would stain work well on this, I want to have different shades through out… I was thinking staining then applying it with a nail gun?
I would use pine instead of plywood!
Hey girl, the link for the plywood is generic to the Lowe’s page!
Great tips, Lauren! I love how you made plank walls budget-friendly and accessible. Can’t wait to try this in my living room!